Desktop app
The desktop app shows your library as a table: add folders, watch each track get its key and tempo, then sort, search and find tracks that mix together. It uses the same analysis as the command line tool, so both give the same answers.
The app is an early version. It runs from a source checkout on macOS; there is no download yet.
Run it from source
Install the requirements in building from source. On macOS you also need Xcode, which provides the Metal shader compiler the interface is built with. Then:
cargo run --release -p euphoria-desktopOn macOS the command opens the app as Euphoria, with its name and icon in the Dock.
Use --release: analysis is many times slower in a debug build.
Add music
On first launch the window shows a card of three steps. Drop a folder, or several folders and files, from Finder onto the window, or click Choose folder in step 1. Later, use Add folder in the toolbar, File > Add Folder or Command O.
The first run card
The three steps fill in as they happen. A finished step dims, and the step you are on has an accent border.
- Add music. Choose a folder or drop one. Once tracks are in, the step says how many were added.
- Analyze. While analysis runs it counts the tracks, for example “312 of 575 · about 4 min left”. The time left is worked out from the rate so far, and appears once about 10 seconds of the run have been seen; before that the step shows only the count.
- Fill in tags. “Missing keys and tempos only. Tags you already have are kept, and every write can be undone.” When a DJ program is chosen under Settings > Tags, the step names it, for example “Writing for rekordbox”. With writing after analysis on, tags are written for you; otherwise Write tags on the step opens the preview. Euphoria does not scan for installed DJ programs for this line: it names the program you chose.
With no music the card fills the window. Once there is a library it stays above the table until the first analysis has ended and the first write of tags has finished, then goes away for good: the settings file remembers it. Someone who already has folders in an older settings file never sees the card.
Folders are searched all the way down for MP3, M4A, MP4, FLAC, Ogg Vorbis, WAV and AIFF files. While Euphoria searches, the toolbar and the empty table say where and how many audio files have turned up so far, for example “Looking for audio files in ~/Music/DJ tracks · 214 found”, or “in ~/Music/DJ tracks and 2 more” when you add several folders. A long path is cut in the middle so the folder at its end stays in view; hover the line to see every path in full. A track Euphoria has analyzed before is filled in at once. Every other track appears as a row marked “Queued”, changes to “Analyzing” when its turn comes, and fills in when its analysis finishes. The toolbar shows how many are done, for example “12 of 340 done”. A file that could not be analyzed counts as done.
The app analyzes as many tracks at once as your computer has cores, up to 4. The command line tool goes up to 8 by default and lets you choose. See large libraries and memory.
Your files are only read, until you choose to write tags into them.
The logo shows when Euphoria is working
The Euphoria mark at the top left of the toolbar is also the activity indicator. While something long runs, the mark draws itself tip to tip, holds, and pulls back, over and over. Hover it to see what is running, for example “Analyzing 120 of 575 tracks” or “Separating stems”. It covers analysis and the search for audio files, writing and undoing tags, stem separation and stem export, export to a DJ program, playlist and shifted copy exports, mashup rendering and building a set. When the work ends the mark finishes the stroke it is drawing and rests as the full mark, so it never jumps. With macOS Reduce motion on, the full mark fades in and out slowly instead of tracing.



The track table
| Column | Shows |
|---|---|
| Title | The title in the file’s tags, or the file name when there is none |
| Artist | The artist in the file’s tags. A tag that lists several artists, separated by a semicolon, a NUL or a slash with spaces around it, shows them as “BlaQRhythm, Elo Mude”. A slash inside a name, as in AC/DC, stays. The tag in the file is not changed. |
| Key | The key’s code, coloured by its Camelot number: Camelot (8A) unless you choose musical (Am) or Open Key (1m) in the settings |
| Musical key | The key by name, such as A minor |
| BPM | The tempo, to one decimal. When the track’s beat grid fits its beats well, it is the grid’s tempo, a whole number when the beats allow it; see how the tempo is made precise |
| Energy | The energy rating from 1 to 10, with a bar |
| Cues | How many cues the track has: the ones you set in the inspector if you changed them, otherwise the ones analysis placed, the same list the inspector shows. Empty until the track is analyzed. |
| Quality | The audio quality verdict: Lossless, Good, Acceptable, Weak, or Re-encoded? for a file likely made from a lower quality one. Weak and Re-encoded? stand out; the others are quieter. Click the column header to sort by it and bring the weak files to the top. |
| Time | The length |
| Format | The file type |
| Folder | Where the file is, from the folder on show |
The Folder column shows the path from the folder chosen in the sidebar to the file’s own folder. With DJ tracks chosen, a file in DJ tracks/afro_house/warmup shows afro_house/warmup; with afro_house chosen, it shows warmup; a file directly in the chosen folder shows a dash. Under All tracks the path starts inside the folder you added, with that folder’s name in front when you added more than one. The column grows to fit the longest path on show, as long as the title keeps room; a path still too long keeps its last folder names in view, and pointing at it shows the whole path. Sorting by Folder groups the files folder by folder, in the order of the sidebar.
Row actions
A row shows only what was scanned. The buttons for acting on it appear at the end of the Title cell when the pointer is on the row, and stay on the selected row. They are laid over the end of the title, so showing them moves nothing.
| Button | Does | Key on the selected row |
|---|---|---|
| Play | Plays the track from where the player has it, replacing the track that sounds. On the sounding row it is a pause button. | Space |
| Star | Stars the track, or takes the star off. A starred track keeps a small filled star before its title even when the pointer is elsewhere. | S (F also works) |
| Add to set | Adds the track to the end of the set on the set builder page, leaving out one that is already there. With a set of several tracks selected, it adds them all. | A |
Each button’s tooltip names the action and its key. Add to set needs a set to add to: build one in the set builder first, or the button says so. Planning a transition from the playing track has no button in the table: the planner works on the track open in the focus view, so it stays there.
The keys type a letter when a text field has the keyboard, so S, A and Space do nothing else in the search box. Needs review rows have the same buttons.
Titles and artists are read from the files after they appear, so the file name shows for a moment first. Pointing at a title shows it in full.
Filter by tempo, energy, quality and stage
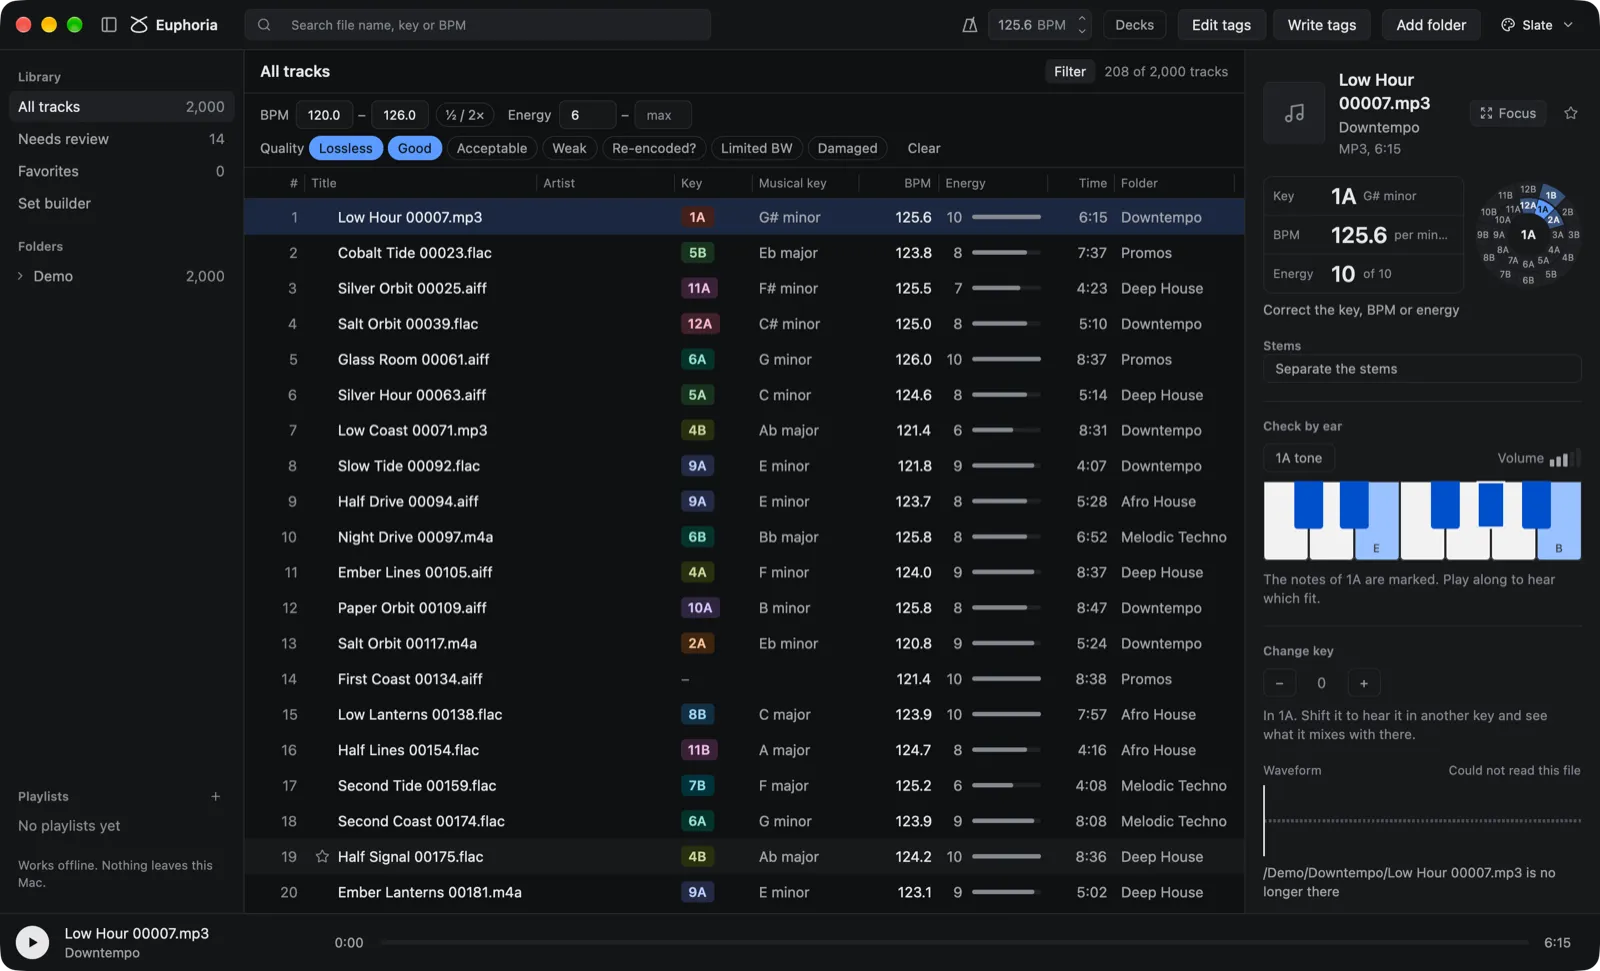
The Filter button at the right of the heading, beside the track count, opens a bar of filters under the heading. Nothing else shows until you use it. The bar stays open while any filter is set, and the button closes it again once none is.
| Filter | How it works |
|---|---|
| BPM | A minimum and a maximum, from 30 to 300, typed with a point or a comma (127.5 or 127,5), the same field rules as the metronome. Leave one side empty for no limit. It uses the tempo you corrected when there is one. |
| ½ / 2× | Off by default. When on, a track also matches if half or double its tempo falls in the range, so 70 to 75 also shows a 142 BPM track (and a 36 BPM one). It does nothing without a BPM range. |
| Energy | A minimum and a maximum, from 1 to 10. It uses the energy you corrected when there is one. |
| Stage | Chips for Warm-up, Build and Peak, the set stage of each track among all the tracks of your library. A track matches when it has any of the chosen ones; a track with no tempo has no stage and is hidden while a chip is on. Pointing at a chip says what the stage means. It is not the energy. |
| Quality | Chips for Lossless, Good, Acceptable, Weak, Limited BW, Re-encoded? and Damaged, named as in the Quality column (pointing at a chip shows the full verdict name). A track matches when it has any of the chosen ones; Damaged matches files with dropped or missing audio whatever their verdict. |
The filters combine with each other (a track must pass every filter that is set), with the folder, playlist, Needs review or Favorites you chose in the sidebar, and with the search box. They apply as you type. A value that is not a number in range leaves that side open.
Tracks that are still queued, being analyzed, failed or missing have no tempo, energy, quality or stage yet, so they are hidden while a BPM, energy, quality or stage filter is set. They come back when you clear it.
While a filter is set the heading says, for example, 37 of 1,284 tracks. Clear at the end of the bar removes every filter and empties the fields; it leaves the ½ / 2× choice as it was. The filters are remembered between launches in settings.json, so the list opens narrowed the way you left it; a settings file from an older version opens with no filters.
Analyze tracks again
Tracks analyzed by an older version of Euphoria lack the fields added since, such as the loudness range the set builder shows. Refresh them on demand instead of analyzing the whole library again:
- Select the tracks. ⌘A selects every track the table shows (Ctrl+A on Linux). It does nothing while a text field has the keyboard, so it never takes ⌘A from the search box.
- Right-click one of the selected tracks and choose Analyze again. With several tracks selected the item says how many, for example Analyze 575 tracks again. Right-clicking a track outside the selection analyzes only that track. Tracks > Analyze Selected Tracks Again and the ⌘K command Analyze selected tracks again do the same for the selection.
The tracks go through the normal analysis queue: the same workers and memory limit, the “12 of 575 done” count with the “about 4 min left” estimate, and the busy logo. The table stays usable while it runs, and each track keeps showing its old analysis until the new one replaces it. Stop in the toolbar (or Tracks > Stop Analysis) skips the tracks still waiting; the ones being analyzed finish. A skipped track that had never been analyzed shows “analysis was stopped” under Needs review, with Analyze again.
Only the analysis is replaced. Your corrections, Looks right confirmations, stars, playlists, edited cues and set builder locks are kept in the cache and the app apart from the analysis. The Analyze again button of a failed track under Needs review uses the same queue. With writing after analysis on, re-analyzed tracks follow the same rules as new ones, so new values go into tags only where those rules allow, which keeps your own tags and updates only Euphoria’s earlier ones.
Not tested: a real run over a large library on this build. The 2,000-track test uses a stubbed analysis.
Set stage
The inspector shows a Stage line under the key, tempo and energy, such as Stage: Peak: where the track tends to sit in a set, from its tempo and loudness compared with the rest of your library. It is not the same as Energy; set stage explains the difference, how it is computed and how well it matches a DJ’s own warm-up, build and peak folders. A track with no tempo has no stage, and no track has one until the library holds 10 tracks with a tempo. Stages are recomputed as the library changes.
To see the stage in the table, turn on Stage column in the settings, under Showing keys and tempos. It is off by default, sits after Energy, is left out first when the window is narrow, and cannot be sorted by yet; the filter bar’s Stage chips narrow the list instead.
Notes
Under the key, tempo and energy (in the Deck theme, in a column of its own next to them), a strip of 12 bars shows how strongly each note sounds in the track, every octave together, from C to B. The notes of the key are lit in the key’s colour and the others are grey, so a doubtful key can be checked by eye: the lit bars should be the tallest. The heading names the key in the notation you chose, and the note names follow its key signature, sharps for a key with sharps and flats for a key with flats. A key you set lights its own notes, which makes it easy to compare with the detected one. Pointing at the strip explains it. Accuracy shows how to read it, and why a minor key and its relative major are easily confused.
A track analyzed before Euphoria measured notes shows one line instead: Right-click the track and choose Analyze again to see its notes. Analyze tracks again measures them and keeps your corrections.
Resize the columns
Drag the line between two column headers to make the column on its left wider or narrower; the pointer turns into a resize arrow over it. Double click the line to fit the column to its longest text among the tracks on show. Each column has a narrowest width, so a key, a tempo and an energy bar always stay readable. View > Reset Column Widths returns every column to its usual width.
Until you resize them, Title and Artist share the room the other columns leave, and Folder is as wide as its longest path. In a narrow window, or when the widths you chose do not fit, the table leaves columns out rather than squeezing the title: first Cues, Format and Quality, which the inspector also shows, so that folder paths keep their room; then Folder, Artist, Time, Musical key and the row number. In a 1440 pixel wide window with both the sidebar and the inspector open, Cues and Quality are left out; fold the sidebar or close the inspector to bring it back. The title, key, tempo and energy always stay.
Click a column header to sort by it, and click again to reverse the order. Sorting by key follows the Camelot wheel: by number, then the minor key (A) before the major key (B). Sorting by Cues puts the tracks with the fewest cues first, and the most when reversed. Sorting by Quality puts the files most worth checking first: likely re-encoded, then weak, acceptable, good, limited bandwidth and lossless. Tracks with no value in the sorted column come last.
Type in the search field, or press Command F first, to filter as you type. Each word must match part of the file name, the title or the artist, the whole key code (8a), or the start of the tempo (124).
Click a row to select it. The arrow keys, Page Up, Page Down, Home and End move the selection. Command click adds a track to the selection or takes it out, Shift click selects every row between, and Command A selects every track on show.
Find anything with ⌘K
Press ⌘K (Ctrl+K on Linux), click the ⌘K chip in the search field, or choose View > Command Palette, to open one box over the window that finds tracks and runs commands. Type, move with Up and Down, press Enter to run the highlighted row and Esc to close. The panel eases in over a moment, and appears at once with macOS Reduce motion on. ⌘P opens it too. Search keeps ⌘F.
Tracks are matched on title, artist and file name, loosely: glsig finds Glass Signal. The box also understands what a DJ asks for. Mix these in any order with words:
| Type | It means | Example |
|---|---|---|
8A, 8a, Am, A minor |
The track’s key, and the keys that mix with it | 8A lists 8A first, then 7A and 9A (pill one step) and 8B (pill relative) |
124, 124,5, 124bpm |
A tempo within one beat, or within half a beat when you type a decimal | 124 lists 123.0 to 125.0 |
120-126, 120–126, 120,5-125,5 |
A range of tempos | 120-126 |
e6, e6+, e7-9, energy 6+ |
The energy rating: exactly 6, 6 or more, 7 to 9 | energy 6+ |
| Anything else | Words that must all be in the title, artist or file name | deep, glass sig |
Combined, 8A 124 deep lists the tracks in 8A or a key that mixes with it, near 124 BPM, with deep in the name, the exact key first and the nearest tempo first. Tempos are the corrected values: a tempo or key you set in the inspector is the one that counts. The palette searches the whole library, whatever the table is showing.
Enter selects the track and shows it in the table. If a search, a filter, a folder or a playlist hid it, they are taken off first. ⌘Enter (Ctrl+Enter on Linux) does the same and plays it.
Under the tracks, Actions lists the commands of the menus, each with its shortcut, so the palette teaches the keyboard: Write tags, Edit tags, Undo last tag write, Add folder, Open decks, Open set builder, Plan a transition from the playing track, Toggle metronome, Separate stems, Export library, Settings, each theme, Toggle sidebar, Focus view and the rest. Search them by name or by what they do: tag finds the three tag commands, key and bpm find Write tags, vocals finds Separate stems, dark finds the dark themes. Plan a transition from the playing track opens the focus view on the playing track, or the selected one when nothing plays, and the planner for its best match as soon as the plan is worked out.
With nothing typed the palette lists the last 8 tracks you selected or played, then the 6 commands you used most in this session, starting with Write tags, Edit tags, Add folder, Open decks, Open set builder and Settings. Neither list is saved: both start empty at each launch.
Limits: typing a bare note such as a or c is a word, not a key; add m or minor (Am, C major). The list shows the 8 best tracks with the number that match. Not tested: how the animation looks at a real frame rate.
The sidebar
- All tracks shows the whole library.
- Needs review shows the tracks worth checking by ear: those whose key is rated low confidence or whose tempo may be counted in the wrong octave, and not yet corrected by you, those whose tags name another key, and those that could not be analyzed, within the folder on show when one is chosen. Its count follows that folder, and a line under the heading says why the tracks are there. Each row carries a small chip for each reason, such as Key: relative or 5th?, and the inspector says how to settle it. The confidence rating itself is not shown; accuracy explains how it is set.
- Favorites shows the tracks you starred, in the order you starred them. See Favorites.
- Missing files shows the tracks whose file is no longer where it was, within the folder on show. The entry appears only while at least one file is missing; when the last one is found again or removed, the table returns to All tracks. See Missing files.
- Folders shows each folder you added as a tree of the folders inside it, to any depth, with the number of tracks in each, counting the folders inside it. Folders with no audio files anywhere inside them are left out.
Browse your folders
Click the triangle beside a folder to show the folders inside it, and again to hide them. Click a folder to show its tracks in the table, including those in the folders inside it; the heading above the table names it. Search and sorting work inside the chosen folder. All tracks shows everything again.
The tree lists folders only. The table is the list of files, with their key, tempo and energy, and the Folder column says where each file sits inside the chosen folder.
After clicking a folder, the keyboard moves through the tree:
| Key | Does |
|---|---|
| Up and Down | Show the folder above or below |
| Right | Show the folders inside, or go to the first of them when they are already shown |
| Left | Hide the folders inside, or go to the folder holding this one |
| Home and End | Show the first or the last folder listed |
A long folder name is cut short; point at it to read the full path. When the tree is taller than the window, it scrolls.
If you add a folder that is inside a folder you already added, it appears in the outer folder’s tree rather than a second time.
Look for new and removed files
Euphoria searches your folders when you add them and each time the app opens. To pick up files you added, moved or deleted since then, click the circling arrows beside the Folders heading, choose File > Rescan Folders, press Command R (Control R on Linux and Windows), or run Rescan folders from ⌘K. To look through one folder only, right click it in the tree and choose Rescan this folder; the rest of the library is left alone.
While the folders are searched the button dims, and the toolbar says where and how many audio files have turned up, as when you add a folder. Then:
- New files, and new folders holding audio files, join the library and the tree. Only they are analyzed; a file the cache already knows is filled in at once.
- The track of a file that is gone leaves the library. When a playlist or a favorite holds it, it stays as a missing file instead, so you can locate it or remove it. The tracks of a folder on a drive that is not connected are kept.
- A file moved to another folder under its own name, or renamed in its folder, keeps its track, its playlists, its stars and what you set, when Euphoria knows its audio from the cache, a playlist or a favorite. It is not analyzed again.
- A file whose size or modification date changed since it was analyzed is analyzed again through the cache, so only new audio is analyzed.
A toast says what changed, for example “3 new tracks, 1 removed”, or “No changes”. The selection, the scroll position, the playing track and any open panel stay as they were, and playback never stops. When the selected track was removed, nothing is selected and the toast says so.
Euphoria does not watch your folders while it runs: a file added in Finder shows after a rescan or the next launch.
To give the table more room, fold the sidebar away. Any of these folds it, and the same one brings it back:
- the sidebar button at the left of the toolbar, beside the window buttons, which stays there while the sidebar is folded
- Control Command S (Control Alt S on Linux and Windows)
- View > Hide Sidebar, which reads Show Sidebar while it is folded
The sidebar slides out to the left in about a fifth of a second while the table grows into the space, and slides back the same way. A click while it is moving turns it around from where it is. With Reduce motion on in macOS Accessibility settings, it folds and unfolds at once. The window opens with the sidebar as you left it, without sliding.
The inspector
The inspector shows the selected track. Three things are always in view, from the top: the header (title, artist, format and length, the Focus button and the star), the key, tempo and energy in three boxes with the Camelot wheel, and the waveform with the cues on it. Everything else sits in sections under them, each with a disclosure chevron like the folders in the sidebar. Click a heading to open or close its section; it eases open over 180 ms, or at once when macOS Reduce motion is on.
| Section | Holds | Open at first |
|---|---|---|
| Mixes well with | The tracks in your library that mix with this one. | Yes |
| Check by ear | The key tone, the chord and the piano. | No, but it opens by itself for a track under Needs review for Key: relative or 5th? or Tag says. |
| Hear it in another key | Transposes playback only, and the tone, piano and chords of Check by ear follow it. Nothing is saved; the exports of the shifted copy and stems are here. | No |
| Stems | Separate the track and choose what to hear. | No |
| Sound quality | The verdict, the reason for it, and what it rests on: codec, bit rate, sample rate, where the content stops, loudness and true peak. | No, but it opens by itself for a weak, likely re-encoded or damaged file. |
| Location | Where the file is on disk. | No |
A section you opened or closed yourself stays as you left it, for every track, and beats the opening by itself. The choice is kept in settings.json, per section, not per track. In the Deck theme the strip keeps the header, the boxes with the wheel and the waveform in view, with the title in a column at least 220 pixels wide on one line (an ellipsis and the full name on hover when it is longer). The sections become small tabs at the strip’s right, Mixes, By ear, Other key, Stems, Quality and Location; click one to show it in the last area of the strip, one at a time. The strip opens on the section that would open by itself, else on Mixes.
The key, tempo and energy boxes each read on one line: the key as “7A / D minor”, the tempo as “124.0 BPM” and the energy as “7 out of 10”, the number large and the rest small after it. The key follows your key notation: with Musical it reads “D minor / 7A”. When the inspector is too narrow for the whole line, only the musical name is cut short, never the key code. In the column beside the Camelot wheel, each label sits on the same centre line as its value, and every row has the same space above and below. A second line under a value, such as the runner up key (“or 8A”), the other tempo (“or 87.0”) or a “reset to …” line, is centred with the value as one block. A value you set shows by you on a line of its own, with a “reset to …” line to go back to the detected value.
The waveform is read from the file when you select the track.
Cover art
Euphoria shows the cover Finder shows. The inspector header has a 56 point square at its left with the cover of the selected track; the player bar shows it at 40 points before the title, the focus view at 72 points before the title, and each deck’s header at 28 points before the track name. Corners are rounded like the other surfaces. A track with no cover keeps the music note.
The cover is the picture inside the file (ID3 attached pictures in MP3, AIFF and WAV, covr in M4A, MP4 and AAC, the pictures of FLAC and Ogg), the front cover when there are several, and the first picture otherwise. Without one, Euphoria uses an image in the same folder named cover, folder, front or albumart (JPEG or PNG, any letter case). Euphoria only reads covers and never writes into your audio files.
Covers are read only for the tracks on screen, never for the whole library, and always in the background: the window draws the note first and the cover when it is ready. The picture is cut to a square and reduced to 192 and 80 pixels, sharp at 2x. The last 64 covers stay in memory, and a cover is read again only when its audio file changed. Nothing is stored on disk, so a cover you change in a folder image shows after you restart or touch the audio file.
Not there yet: covers in the table rows, the ⌘K palette and the “Next after” rows; the Deck theme’s strip header shows no cover.
What else the key and the tempo could be
The Key and BPM boxes show no confidence word. A key or tempo Euphoria doubts puts the track under Needs review, which says in words what may be wrong: the key may be its relative or a fifth away, or the BPM half or double. A doubtful tempo is listed only when half or double it is a tempo a DJ could count; accuracy says why.
When the key is not rated high, the key that matched second best sits beside it, as a chip such as “or 9A”: play the track and compare the two by ear. When a DJ could plausibly count the track at half or double the tempo, that tempo is shown under it, such as “or 87.0”. Click either to use it instead, as the next section explains.
When the tags name another key
Euphoria reads the key already written in each file’s tags, by Euphoria, rekordbox, Mixed In Key, Traktor or any other program, in Camelot, Open Key or musical notation. When it names another key than the one detected, a red ≠ sits beside the key in the table, the track is listed under Needs review, and the inspector says under the Key box what the tags say and how the two keys differ:
- a fifth apart: one step on the Camelot wheel, such as 8A and 9A. The keys share six of their seven notes, the most common mix-up between detectors, and both mix well with the same tracks.
- relative key: the same number with the other letter, such as 8A and 8B. The keys share all seven notes; listen for whether the track sounds minor or major.
- parallel key: the same home note in the other mode, such as A minor and A major. Listen for minor or major before you trust either.
- different key: the keys share few notes, so one reading is wrong or the track changes key. Check by ear before you mix on it.
Point at the ≠ for the key from the tags. When the tags agree, the inspector says so quietly; text that is not a key, such as a word typed into the key field, is shown as it is and does not put the track under Needs review. Setting the key yourself, as the next section explains, takes the track off the list. The tags are only read: nothing changes them until you write tags, after which they name the key you see.
Settle a track under Needs review
A track is under Needs review for one or more of four reasons. In the list each row has a red chip per reason; select the track and a Needs review box at the top of the inspector says each reason in plain words, with the quickest ways to settle it. The track leaves the list, and every count (Needs review, and the folders’) drops at once, as soon as its last reason is settled.
| Chip | What it means | How to settle it |
|---|---|---|
| Key: relative or 5th? | The key is rated low confidence: it may be its relative key or a key a fifth away. | Play the key tone or the piano under the Key box (see check the key by ear). Then click Try with the second best key if it is right, Correct… to pick another, or Looks right to keep the detected key. |
| BPM: half or double? | Half or double the tempo is a tempo a DJ could count, between 75 and 200 BPM or the ends of your tempo range when those are further out, and either the tempo is rated low confidence or the drums and chords repeat more strongly after a beat and a bar of that octave than of the tempo shown: the BPM may be counted in the wrong octave, the most common tempo error. A track at 120 is not listed, since 60 and 240 are not plausible; one at 174 is, since it may be 87. | Turn on the metronome in the toolbar: it starts at the selected track’s tempo, so you can hear whether the clicks sit on the beat. The box names the other tempo and offers one button for it, ½ × or 2 ×, or Looks right to keep the tempo. |
| Tag says 8A | The key field in the file’s tags names another key than the one detected (the same case as the red ≠; see when the tags name another key). | The box offers Keep the tags’ key, which sets it as your key, or Use the detected key, which confirms it. Either way the conflict does not come back. |
| Failed | The file could not be analyzed. The box gives the reason. | Fix the file if the reason points to a problem, then click Analyze again. A file that fails again stays under Needs review. |
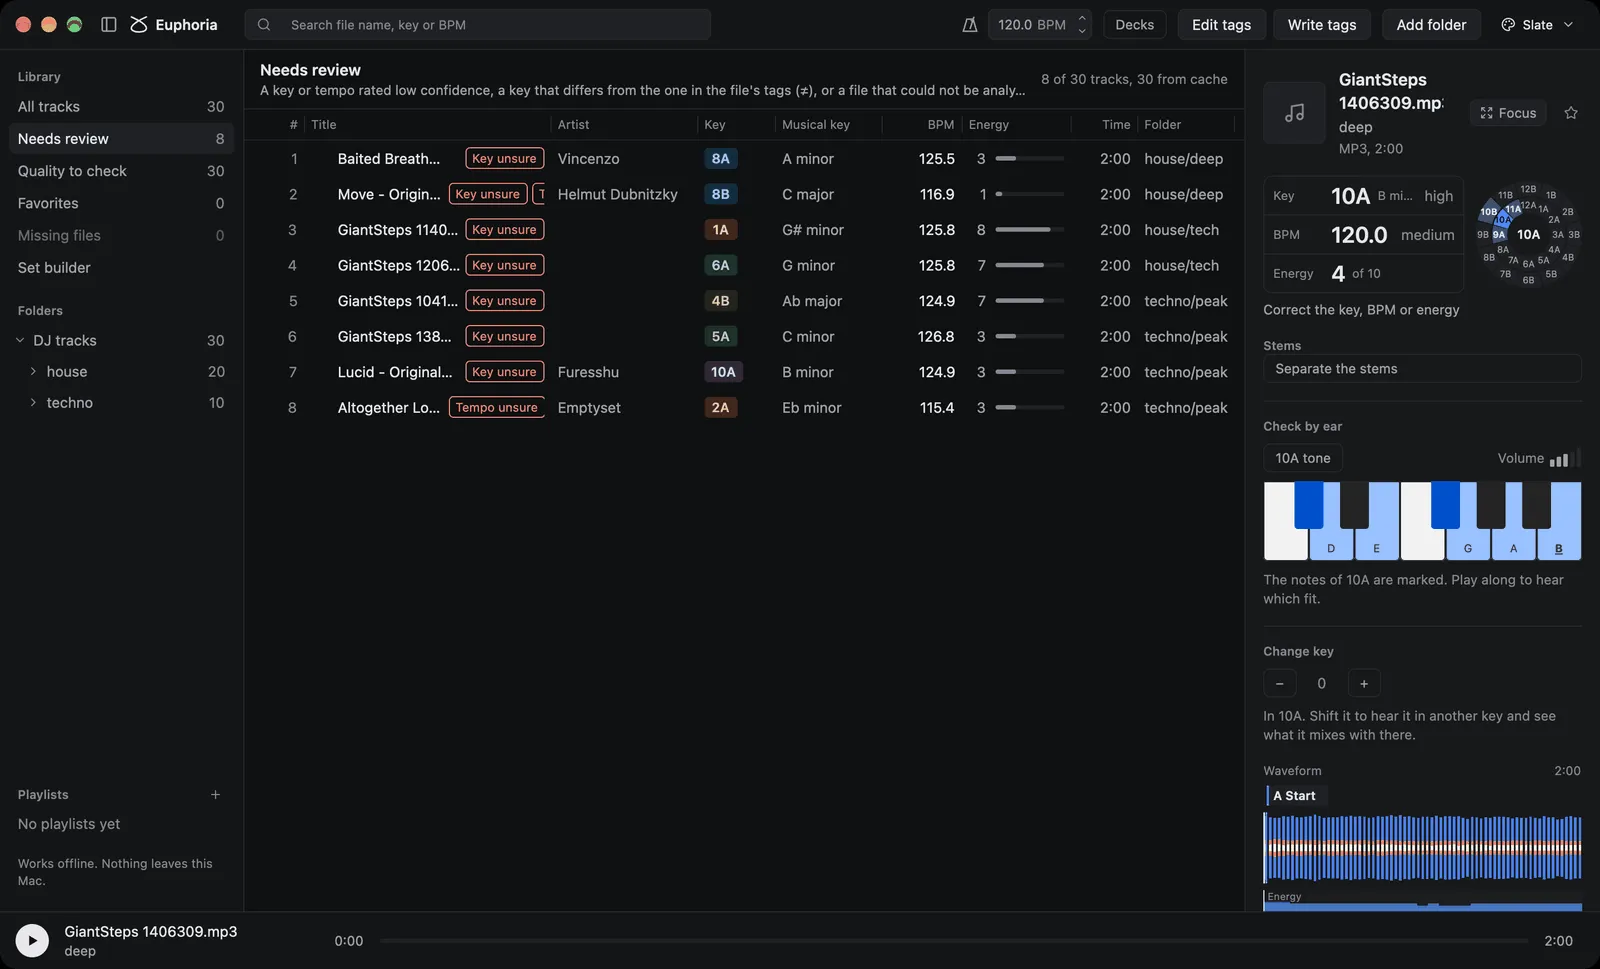
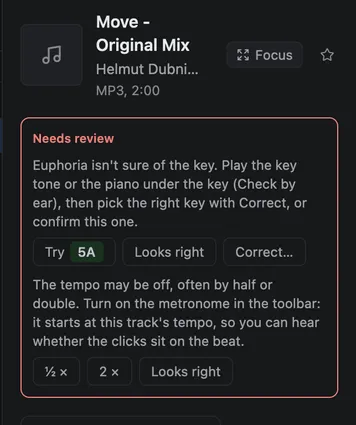
When a row has several chips and the Title column is narrow, the last chips are cut off; widen the column or select the track to see every reason.
Looks right confirms the value without changing it. It is kept in the analysis cache with your corrections, so it survives quitting and analyzing the track again, and euphoria cache clear keeps it. It is not a correction: the track keeps the detected key or tempo, its beat grid and its cues (a tempo you set drops them), the inspector does not say “by you”, and it is not written to tags or exported as something you changed. Confirming the key also settles a tag conflict, since you looked at the key and kept it. Setting a key or a tempo yourself replaces the confirmation of that value; resetting it brings the doubt back.
Only the second best key is kept by the analysis, so Try offers one key, not three; use Correct… for any other. The command line’s needs_review field does not know about confirmations yet.
Check the key by ear and correct it
Open Check by ear, under the waveform, to settle a key you are not sure of while the track plays:
- 8A tone, named in the key notation you chose, plays a soft drone of the key’s root and fifth over the track. When the runner up key is offered, a second button plays its drone. The drone that sounds right under the music is the key; one that clashes is not. Click the button again to stop it. Only one drone plays at a time, and it stops when you select another track. The drone leaves out the third on purpose, so it sounds the same for a minor key and its parallel major; the piano settles that.
- The piano covers one octave from middle C. The notes of the key’s scale are tinted and named, and its root is marked. Click a key to play it over the track: notes of the right scale fit the melody, others stand out.
- Play chord plays the key’s tonic triad on the piano voice: the root, the third (minor or major, as the key is) and the fifth, together, stacked upward from the root in the octave of the piano. For 8A it plays A, C and E; for 8B, C, E and G. The three piano keys light up while the chord rings, about two seconds. When the runner up key is offered, the buttons read 8A chord and 9A chord so you can compare the two. A chord settles what the drone leaves open: whether the track sounds minor or major over that root. Shift-click plays the chord as an arpeggio, one note after another about 120 ms apart. The chord can sound over a drone.
- Volume sets how loud the drone and the piano are over the track, in five steps, and moves a drone that is already playing.
The tone, the piano and the chords follow Hear it in another key. Move the track up or down by N semitones and they move with it: the tone plays the new key’s root and fifth, the piano tints the new key’s notes, the chords play its triad, and the labels name it. Hearing a 7A track 2 semitones up, for example, gives 9A tone and 9A chord, and the runner up button moves the same way. At 0 semitones nothing changes. The control moves up to 6 semitones either way,, so +7 is out of reach; -5 gives the same key. The key shown in the inspector and the table is still the track’s own; only what you hear and see in Check by ear moves. A drone that is already playing retunes to the new key at once. All of them follow the tuning analysis measured, so a track tuned a little sharp or flat gets a reference that matches it.
When your ear disagrees with Euphoria, correct the value:
- Click the runner up chip (“or 9A”) to take that key, or the other tempo (“or 87.0”) to take that tempo.
- Or click Correct the key, BPM or energy to pick any of the 24 keys, laid out in Camelot order, type a tempo such as 124 or 87.5 and press Return or Use this tempo, or pick an energy from 1 to 10.
- The box then says by you where it said how sure the value was, and the line under it offers reset to 8A, the detected value, to undo your correction. For the energy, Reset to detected in the editor does the same.
An energy you pick is the same 1 to 10 rating the analysis reports, for the tracks whose energy you disagree with, for example a quiet track that lifts a room. It is kept and used like a corrected key or tempo, and a track with a corrected energy keeps its detected key, tempo, beat grid and cues.
A value you set wins everywhere: in the table and search, in Mixes well with, in Needs review, which no longer lists a track for a value you corrected, in the tags you write, and in euphoria analyze and euphoria export rekordbox on the command line, which mark it as set by you. Corrections are kept in the analysis cache, apart from the analyses: analyzing a track again, or a new version of Euphoria analyzing everything again, never loses them, and they follow a file that was moved, renamed or had its tags written. euphoria cache clear keeps them too.
Mixes well with lists up to eight other tracks in your library whose key mixes with the selected one and whose tempo is close to it. It uses the same saved controls as the suggestions under the decks, described under Narrow the suggestions: the key moves that count (the same key, the keys one step either way on the Camelot wheel and the relative major or minor, until you change them), the tempo window (6 percent), the tempo and energy ranges, the genre, and the pool chosen with Whole library, Tracks shown, Favorites or a playlist. The smoothest key moves come first, then the closest tempos, then the closest energy. Transitions you marked as favorites come first and stay even when the controls would leave them out. Each row shows the key, the name, how much faster or slower the track is, and how the keys relate. Click a row to go to that track; it does not change what plays. When a saved filter narrows the list, a line under the heading says what is narrowed, and clicking it opens the decks, where the controls are. When the filter leaves nothing, the list says so. The Camelot wheel marks the keys that the same key moves reach, and clicking it lets you change the moves. Keys and the Camelot wheel explains these moves.
Next after the playing track. While the player or a deck plays a track, the section’s heading becomes Next after and the title of the playing track, and the list ranks the tracks to play after it instead of the ones for the selected track. The same happens in the Mixes tab of the Deck strip. When nothing plays, the section is Mixes well with for the selected track, as above. With the decks open, the track heard more, by the crossfader, is the one followed.
- Keep, Lift, Drop. The control in the heading chooses where the energy goes. Keep ranks tracks at the same energy first, Lift tracks one or two points higher, Drop tracks one or two points lower. The choice is remembered. The order is the core’s, the one under the decks: how smooth the key move is, how close the tempo is, and how well the change of energy fits.
- Why a track fits. Each row shows the key, the title, the tempo change, and one or two small labels: how the keys relate (same key, one step, relative, wheel diagonal, or energy boost, mood change, semitone boost) and the track’s energy with an arrow and the size of the change from the track playing, such as energy 3 ↓6 (6 calmer), energy 8 ↑1 (one higher) or energy 7 = (the same). Pointing at it says the same in words.
- Filters apply. The filter bar’s tempo, quality and energy filters, and the suggestion controls, narrow the list, so it never suggests a track you filtered out. The playing track and the tracks that played since you opened Euphoria are never listed. The list is ranked again when the playing track, the selection, the filters or the energy choice change, not while the track plays.
- Look at a row in place. Clicking a row opens it inside the list and leaves everything else alone: the selection and the inspector stay where they were, on the playing track if you started it from there, and the sound goes on. The open row shows the track’s key, tempo and energy in one line, under its labels, and three buttons: Play (Load on deck B when the decks are open), Plan transition, which opens the transition planner from the playing track to this one, and Add to set, shown when there is a set in the set builder. One row is open at a time. Click it again, or press Escape, to close it; Up and Down open the row above or below. The row opens and closes with a short ease, and at once when Reduce motion is on.
- Play a row. Press Enter, double-click a row, or click Play in the open row to play it in the player, or to load it on deck B when the decks are open. Enter plays the open row, or the first when none is open. The track that plays goes on until the new one starts, and then the inspector and the list follow the new track. The icon buttons that show when you point at a row do the same: play, and load on deck B.
Dragging a row onto deck B is not supported: the decks accept no drops yet. Use Enter, double-click or the load button.
The Camelot wheel
Every theme shows the Camelot wheel for the selected track’s key, in its own colours. The minor keys (A) are on the inner ring and the major keys (B) on the outer ring. The selected key is filled in the accent colour, the strongest mark on the wheel. The matching keys, the ones your key moves reach, get a tint and a ring in the colour of the move that reaches them: blue for one step on the wheel, amber for relative, teal for wheel diagonal, pink for energy boost, violet for mood change and olive for semitone boost. By default the wheel marks the neighbours one step either way and the relative major or minor, so at 12A it marks 11A and 1A in blue and 12B in amber. Each key is reached by one move at most, so a key never needs two colours. Rest the pointer on a key to see its Camelot code and its name, and on a matching key the move that reaches it, such as 1A, Bb minor, one step on the wheel. Rest it on the centre or between the keys for Click to choose key moves.
Click the wheel to choose the key moves. A small menu opens over the window with a toggle for each move (same key, one step on the wheel, relative, wheel diagonal, energy boost, mood change and semitone boost), each after a small square in its colour on the wheel, so the menu doubles as the legend. Under them, Reset to default moves goes back to same key, one step and relative. Then come the Show matching keys toggle and All key settings…, which opens the settings scrolled to the same moves. The moves are the saved ones under Narrow the suggestions, so changing one here also changes the Next list under the decks and Mixes well with, and the settings show the change at once. The last move counted stays on. Click outside the menu or press Escape to close it.
When the matching keys are shown but the moves reach no other key, which happens when only Same key is ticked, a muted line under the wheel says Only same key is ticked. Click it to open the moves. In the Deck theme the wheel gives up the height of that line, so the strip does not grow.
To show only the selected key, turn off Show matching keys on the wheel in the settings, under Showing keys and tempos, or in the wheel’s menu. It is on by default and saved with the other settings.
The colours are checked in every theme, for every move: a matching key differs from the other keys by at least 1.5 to 1 in contrast and its ring by 3 to 1, the selected key differs from a matching one by 1.5 to 1, and the code on every cell reads at 4.5 to 1 or better. The rings of any two moves are told apart in the OKLab colour space, and one step and relative, the two common moves, stay apart for protanopia and deuteranopia too, the two kinds of red-green colour blindness.
In the column themes the wheel sits to the right of the key, tempo and energy boxes, 96 pixels square, so it is in view without scrolling. In the Deck theme it is a square next to the key and tempo in the strip, as tall as the strip allows inside its padding, between 100 and 220 pixels, so it shrinks with the strip and is never hidden. The focus view shows a smaller wheel in its header. The wheel keeps Camelot codes whatever notation the table uses.
Resize the inspector
Drag the left edge of the inspector to make it wider or narrower. The pointer turns into a resize arrow over the edge. The waveform, the three boxes and the list of mixes follow the new width. Double click the edge to return to the usual width.
| Width | |
|---|---|
| Usual | 320 |
| Narrowest | 288 |
| Widest | 640, or less when the window is small: the table always keeps at least 400 |
In the Deck theme the track detail is a strip under the table, and you drag its top edge to change its height in the same way. The waveform grows with the strip, and a taller strip lists more mixes. The strip is 180 high to begin with, and goes from 142 to 420, always leaving at least 200 for the table.
A size you chose in a large window is kept when the window gets smaller. It is only drawn smaller while the window has no room for it.
Listen to a track
Select a track and press Space, or click the round play button, to hear it. Press Space again to pause. Playing starts at once, however long the track is, and carries on while other tracks are being analyzed. Space types a space as usual while you are in the search field.
- A click only selects. Clicking a row, moving with Up and Down, picking a track in the command palette with Enter, and clicking a row of the set builder or of the Mixes list change the selection and the inspector, never the sound. While a track plays you can browse the library and read other tracks’ details without interrupting it, and the player bar goes on showing the track that plays. While paused or stopped, selecting a track gets it ready to play. A click in the Next after list opens the row in place instead, as described under Next after the playing track.
- Playing a track is explicit. Double-click a row, press Space on it, or click the play button that shows when you point at it. This replaces the track that was playing and starts the new one from its beginning. Space pauses when the selected track is the one that plays. In the command palette, ⌘Enter plays; in the Next after list, Enter or a double-click plays. In the table, Enter still opens the focus view, and a double-click plays instead of opening it.
- The position and the length are shown as “2:23 / 6:48”.
- When a track reaches its end it stops there. Play starts it again from the beginning.
In most themes the player is a bar along the bottom of the window, with the play button, the track, the position, the track’s waveform as a seek bar and the length. In the Deck theme the play button and the position sit in the strip under the table, beside the wide waveform.
To find the playing track again after browsing, click its title or its cover in the player bar. The title is underlined in the accent colour when you point at it, with the tooltip Show in the library. The track is selected, scrolled into view and shown in the inspector. A search, a filter, a folder or a playlist that hides it is taken off, and the focus view and the set builder close so the table is in view. It keeps playing, or stays paused, as it was. In the Deck theme, while another track is selected, the strip reads “Playing title”, and clicking that title does the same.
If a track cannot be played, the player says why in a few words, for example “This file is no longer there” or “No audio output to play through”, and everything else keeps working.
If the sound breaks up while the Mac is busy, for example during a large analysis, the terminal shows “the output ran short of sound”. Pause the analysis or run it with fewer workers; EUPHORIA_LOG=debug shows every occurrence. Without EUPHORIA_LOG, the terminal shows Euphoria’s own warnings and only errors from the libraries it uses; set EUPHORIA_LOG=warn to see library warnings as well, such as a decoder skipping a few junk bytes at the start of a file.
Media keys and Now Playing
On macOS, the play/pause key (F8), the buttons of AirPods and other headphones, and the Now Playing widget in Control Center and the menu bar control Euphoria while it has a track playing or paused. Euphoria also shows the track’s title, artist, album, cover, length and position there.
| Command | What it does |
|---|---|
| Play, Pause, play/pause key | Plays or pauses the track in the player. When the selected track is not the one the player holds, Play resumes the held one. |
| Next, Previous | Select and play the next or previous row of the table as shown. In the set builder with a set, they follow the set order, as the set does when a track ends. Previous goes back to the start of the track when more than 3 seconds in. |
| Drag the position in Now Playing | Seeks the track. |
While the decks are open, the keys control one deck: the one that plays, the favoured side of the crossfader first, so deck A while it is centered, and when neither plays, the favoured deck that has a track. Next and Previous do nothing on the decks.
Now Playing is told what plays when the track, the play state, the playback tempo or the position changes by a jump (a seek), not at every moment: macOS counts the position along by itself. The length and the position are those of the track as recorded, and macOS counts them at the playback tempo, so at +5% the position moves 5% faster and reaches the end with the track, as the player bar does. A paused track stays in Now Playing, shown as paused, so the next press of the key resumes it. It is cleared only when the player holds no track, for example after a track ends, and when Euphoria quits. Once it is cleared, macOS sends the play/pause key elsewhere, for example to Music, until Euphoria plays again.
Now Playing shows the track you hear. A track you ask for while another plays waits aside until its sound starts, as in the player bar, and Now Playing changes to it then.
The cover is the one the player bar shows: the picture in the file’s tags, else a cover, folder, front or albumart image in its folder, cut to a square and reduced to at most 600 pixels on a side. It is read in the background when the track changes, so the new track shows without a cover for a moment, never with the old one.
Not there yet: Linux (MPRIS would be the equivalent). The macOS calls have not been checked by an automated test, which uses a stand-in for them: press the keys yourself and report anything off.
Metronome
The metronome button sits in the toolbar, at the right, beside the Decks button. Click it, or press M while the table has the keyboard (not while you type in a field), to start a steady click in 4/4 with an accented first beat. Click it again to stop. It plays through the same output as the track and the decks, so it sounds with or without a track playing.
The tempo field beside it takes the tempo of the metronome, from 30 to 300 beats per minute in steps of 0.1:
- Click the field and type a value, then press Return. “127,5” and “127.5” both work.
- Scroll over the field to move it by one beat a notch, or by a tenth with Alt held.
- Click the small up or down arrow at the right edge of the field to move it by 1 BPM, or by 0.1 with Alt held. A value with decimals keeps them (127.5 becomes 128.5). The arrow that would pass 30 or 300 is dimmed. Holding a button down does not repeat; click again.
- While the field is open for typing, the Up and Down keys do the same (Alt for 0.1) and the field stays open. When the field is not open, Up and Down still move through the track table.
- The field starts at 120. Until you type, scroll or step to a value, it takes the tempo shown for the selected track, so the usual case needs no typing. Once you set a value, it stays until you change it, whichever track you select.
- A new tempo is used from the next beat, without restarting the bar.
Under Settings > Metronome you choose the sound (Classic click, Woodblock, Hi-hat or Beep, with a click played when you choose one), the volume in five steps, and whether the first beat of every bar is accented. They are kept in settings.json.
The clicks are made in the app, not played from files, and are placed by counting audio frames, so they keep their tempo however long they run.
Locked to the playing track. While the metronome is on and the player is playing a track that has a beat grid, the clicks land on the track’s beats instead of free-running: they are placed from the grid’s first downbeat and tempo and the player’s position, counted in audio frames at the output, not from a timer in the window. The accent falls on the first beat of each bar of the grid. The field then shows the tempo it follows, with “locked to track” after it. At the track’s own speed that is the tempo in the table and the inspector: a grid that fits the beats well gives the track its tempo, and a track whose grid fits poorly, such as a live recording whose tempo drifts, keeps the tempo detector’s, which can differ from the grid’s by a few tenths. The clicks follow the playback tempo too: at +4% they come 4% faster, with key lock on or off. A seek, a click on a waveform or a cue jump re-aligns them on the new place, with no stray click. With no beat grid (or a tempo you set by hand, as on the decks), nothing playing, or the player paused, the metronome clicks at the tempo in the field as before. While it is not locked, and you have not typed a tempo, the field follows the selected track’s tempo at the playback tempo you chose.
Stems
The track detail can separate a track into its four stems with the Demucs model, and then you can hear any part of it on its own. Select a track and click Separate the stems in the track detail: while it runs a progress bar takes the button’s place, and when it is done the player offers what to hear.
The progress bar is the same everywhere a separation shows: the Stems section, the Vocals lane under the waveform, the decks and the focus view. It fills from left to right in the accent tint, with a caption over it such as “Separating the stems · 42%”. Before the model runs, the caption names the stage instead: “Loading the model”, “Decoding the track”, or “Downloading the model 120 of 214 MB” the first time a mode is used. Once a few segments are done it adds a rough time left, for example “about 3 min left”. A track waiting behind another separation says “Waiting: 2 tracks ahead”, with the bar empty. The fill eases to each new reading, at most ten times a second, and jumps instead with macOS Reduce motion on.
- Choose Full track, Acapella or Instrumental to play the file itself, the vocals stem, or the drums, bass and other stems added together. The position in seconds is kept, so switching between them lands at the same moment of the track.
- Remove stems deletes the saved stems of the track. The track detail then offers to separate it again.
- Export stems…, Export acapella… and Export instrumental… save the stems to disk as WAV files. When the key shift is not zero, a second row exports them in the shifted key. Saving stems describes the file names and the rules.
Decks
Two decks under the table let you try a transition before the set: Decks in the toolbar, View > Decks or Command Shift D shows them, and the same again hides them and stops their sound. While they are on screen they take the sound, so the player pauses. Close the decks to use the track player again.
- Load a track: select it in the table and click Load selected on deck A or deck B, or click a track in Next on deck B to put it on deck B.
- Each deck shows its key, its tempo, its waveform with a mark on every bar of its beat grid and on each cue, its energy over time, and its cues as buttons. Click or drag on the waveform to move the deck there.
- Play starts a deck, and Pause holds it. When the other deck is playing, playback is scheduled so their upcoming downbeats line up. It starts from the selected position and may wait additional bars to align them; the button says so while it waits. A cue button plays from that cue with the same alignment.
- Sync to A, on by default, plays deck B at deck A’s tempo: a track at 125 BPM next to one at 120 plays at 96 percent of its speed. A track counted at half or double tempo is matched at that tempo. Key lock, on by default, keeps a deck’s pitch when its speed changes; off, the pitch follows the speed as on a turntable. Key lock and Sync to A are switch rows, each with a one line helper under its name, like every other on/off setting. The deck shows its own tempo and the tempo heard, such as 125.0 → 120.0 BPM.
- The mixer has a volume fader for each deck and a crossfader between them. The crossfader moves equal power from one deck to the other: at the middle both play at about 71 percent, and a deck at the near end of the fader plays at full. Use the deck faders to balance the combined level. Under the mixer, the share of one core each deck takes and any frames the decoders could not fill in time are shown, for checking that playback keeps up.
- Loop bars 1, 2, 4, 8 and 16 loop that many bars of a deck from its next downbeat. The loop is marked on the waveform, and the lit button shows the length. The deck keeps the samples of the loop’s first pass and plays them again, so every repeat is the same sound and joins the next on the beat, with no gap. Press the lit button again to leave: the loop plays to its end once more and the track carries on from there, still on the beat. Another length starts a new loop at the next downbeat. Moving the deck, playing a cue or loading a track ends the loop. Looping needs the track’s beat grid, so a track whose tempo you corrected by hand does not loop.
Time stretching is done by the Signalsmith Stretch library. The decks keep a quiet Load note under the faders; point at it for the share of a core each deck uses. It turns into an amber “Sound skipped: the computer was busy” when the decks could not prepare the next slice of sound in time, which you hear as a short click or gap; the tooltip gives how many samples were missed. It usually means another heavy program was running at the same moment. While the decks are open the track player at the bottom is hidden, since the decks hold the sound. Decks only line up on downbeats when both tracks have a beat grid, which is found during analysis; a track whose tempo you corrected by hand has no grid, since the grid was fitted to the detected tempo, and starts at once.
Next on deck B
With a track on deck A, Next on deck B lists the tracks that would mix well after it: keys that mix with it, tempos within 6 percent, at half or double tempo too, ranked by how smooth the key move is, how close the tempo is and how well the energy fits where you want the set to go. Energy down, Same energy and Energy up choose that direction: up prefers a track one or two points higher, down one or two lower. Whole library, Tracks shown, Favorites and a button for each playlist choose where the suggestions come from: every track, the tracks the table shows, such as a folder or a search, the tracks you starred, or the tracks of one playlist. Each row gives the key, the tempo difference, the energy with its change from deck A’s (energy 8 ↑1, read the same way as in the Next after list) and how the keys relate, in the same words as Mixes into. Click a row to load it on deck B.
Narrow the suggestions
Above the list, a row of controls narrows the tracks the suggestions are chosen from. They apply to Next on deck B and to the mashup ideas alike, take effect as you type, and are kept for the next launch.
- Key moves. A button per move chooses which ones count: Same key, One step on the wheel, Relative, Wheel diagonal (one step and a major/minor switch), Energy boost, Mood change and Semitone boost. A lit button counts. Same key, One step on the wheel and Relative are lit until you change them, and the last lit button stays lit, so there is always a move to suggest. Keys and the Camelot wheel shows where each move goes on the wheel.
- Tempo window. How far a track’s tempo may be from deck A’s, in percent. Empty keeps 6 percent for mixing and 8 percent for mashups.
- Tempo from … to … BPM. Only tracks whose own tempo lies in the range, both ends included. While a range is set, a track without a detected tempo is left out, since it cannot be checked.
- Energy from … to … of 10. The same for the energy rating. It decides which tracks are in the pool; Energy down, Same energy and Energy up still order what is left.
- Genre. Only tracks whose genre tag contains the text, in any case, so “house” keeps Deep House and Tech House. While the field has text, a track without a genre tag is left out.
A range needs both ends. A field that does not read, such as one end of a range on its own or an energy of 11, shows what is wrong in red and leaves that part of the pool open until it reads.
Mixes well with in the inspector uses these controls too, so the list beside a track and the list under the decks always agree on what counts as a mix.
Mashup mode
Mashup above the list under the decks swaps the tracks to play next for tracks that layer over deck A, with a key shift and stems for each, and Export mashup… renders the pair to a WAV file.
See Mashups.
The waveform
The waveform shows the whole track from left to right, and its colours show what is sounding:
| Colour | Band | Typical sounds |
|---|---|---|
| Blue | Bass, below 200 Hz | Kick drums and bass lines |
| Amber | Middle, 200 Hz to 2.5 kHz | Vocals, chords and snares |
| White, or near black in the Paper theme | Treble, above 2.5 kHz | Hi hats and cymbals |
The three are drawn on top of one another, bass at the back, each as tall as that band is loud. A stretch with a kick is tall and blue, a breakdown without drums loses its blue and shrinks to amber, and hi hats show as light tips.
The waveform is also where you move through the track. A line marks where playing is, and the part already played is fainter. Click anywhere on the waveform to jump there, or hold the button and drag. Before you press play, a click sets where playing will start. A click on a paused or stopped track only moves the position and does not start playing; while a track plays, a click moves the sound and it keeps playing.
The waveform in the player bar
The player bar draws the selected track’s waveform about 40 pixels tall: the part already played in the accent colour, the rest muted. It reuses the waveform the inspector already decoded, so it costs no extra decoding. Click or drag anywhere on it to seek, with the same rule as above.
- Each cue is a thin line in the accent colour with its hot cue letter above it (a dot for a memory cue). Click the letter to jump to the cue; it does not start or pause playing.
- Each section boundary (Intro, Main, Breakdown, Drop, Outro, or Section 2, Section 3 for tracks without clear drops) is a faint tick. Hover it to see the section’s name.
- While the waveform is not ready, because the track is not analysed yet or the audio is still loading, the bar shows the thin progress line instead. A track whose file is missing shows the thin line and nothing else.
The bar’s bars are computed once per track and again only when the window is resized. The Deck theme has no player bar, so it keeps the wide waveform in the strip.
Cue points
A row of markers above the waveform shows the track’s cues, each at its place on the waveform with its hot cue letter and its name, for example “A Start” and “B Drop”, and a line in the accent colour runs down the waveform at each one. When analysis places automatic cues, the track starts with them on the bars of its beat grid, on hot cue pads from A in order. Click a marker to play from its cue.
To change the cues:
- Drag a marker to move its cue. It lands on the nearest beat of the beat grid, or on the nearest first beat of a bar while you hold Shift. A track without a beat grid, or with a tempo you set, has no grid to snap to, and a cue stays where you drop it.
- Double click the waveform to add a cue there, or click Add at playhead in the Cues list under the waveform, or press C, to add one where playing is. A new cue is called “Cue” and a number, lands on the nearest beat like a moved one, and takes the first free hot cue pad. A ninth cue, with every pad from A to H taken, is a memory cue only.
- In the Cues list, each automatic cue shows the energy of its section, the 1 to 10 rating of the audio from it to the next cue, beside a dot in the colour the cue gets in exports. Your own cues show none.
- In the Cues list, click a name to rename the cue, and press Return to keep the new name. Click the letter before it to put the cue on another pad from A to H, or on none for a memory cue only: a cue already on that pad takes the one the cue leaves. Click the time to play from the cue, and the cross to delete it.
- Undo, or Command Z when no text field has the keyboard, takes back the last change to the selected track’s cues, one at a time. Playback > Undo Cue Edit does the same.
- Reset to automatic cues forgets your cues and brings back the ones analysis placed. It can be undone too.
The first change makes the track’s cues yours: the list says by you, and your set replaces the automatic one wherever cues are used, deleting every cue included. In euphoria analyze --json its cues are yours and set_by_user lists "cues", and euphoria export rekordbox --cues exports them. Your cues are kept in the analysis cache apart from the analyses, like corrections: analyzing a track again, a new version of Euphoria analyzing everything again, or euphoria cache clear never loses them, and they follow a file that was moved, renamed or had its tags written. A tempo you set drops the automatic cues, which sit on the grid of the detected tempo, but keeps yours.
In the Deck theme the list sits in the strip beside the waveform once the track has cues, and scrolls when they do not fit.
The lanes under the waveform
Under the waveform, each across the same width, run the lanes that say what the track does over time. They line up with the waveform, so what is under a part of it belongs to it, and the playhead runs through all of them. The part already played is fainter.
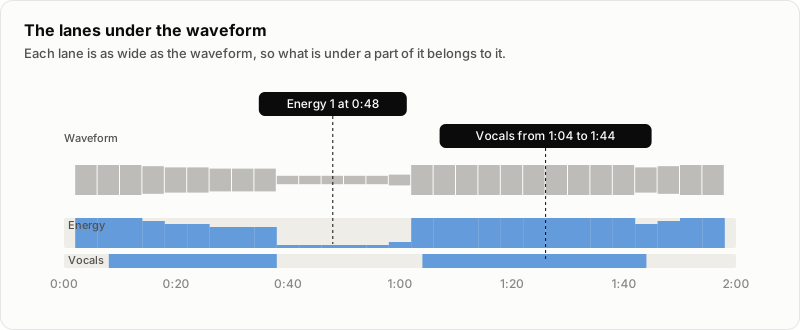
Energy. A row of bars shows the energy curve: the energy rating from 1 to 10 of each stretch of the track, as tall as the rating, with the label Energy at its left. The core rates an 8 second window every 4 seconds, so each bar is one rating, and the tooltip on the label says “Energy over time, 1 to 10, rated every 4 seconds”. Point anywhere on the row to read the rating under the pointer, for example “Energy 3 at 2:15”. Breakdowns show as low bars and drops as a jump back to full height. Silent stretches have no bar and read “Silent”. The curve is worked out from the same decoded audio as the waveform, so it appears a moment after it. When it cannot be worked out, the row says “Energy over time not available”, and pointing at it shows why.
Vocals. A thinner row under the energy, labelled Vocals, is filled where there are vocals and empty where there are none. Point at a filled stretch to read where it starts and ends, for example “Vocals from 1:02 to 1:48”, or at an empty one to read “No vocals from 1:48 to 2:30”. It is drawn from the track’s separated stems, with no separate detector: the level of the vocals stem is measured in the same 8 second windows as the energy, so a vocal stretch starts and ends on the same 4 second steps as the energy bars.
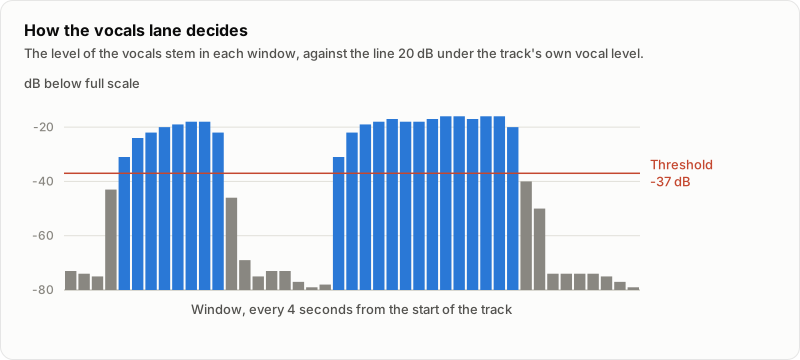
A window counts as vocals when its level is within 20 dB of the level the loudest tenth of the track’s windows reach, which is the track’s own vocal level, and above -50 dB below full scale. Judging against the track’s own level means a quietly mixed vocal and a loud one are both found, and the floor keeps the faint leak of other instruments into the stem of an instrumental from drawing as vocals. A window where vocals sound for only a second or two of its 8 seconds can fall under the line, so a stretch can start or end a step later than the first note. The levels are measured once, off the main thread, and kept in the folder of the track’s stems, so the lane appears at once the next time. It is drawn for a track whose stems are separated, in this session or an earlier one.
A track whose stems are not separated has the lane empty, with the quiet link Separate the stems to see the vocals. (In the focus view the vocals and stems lanes give way to one card instead, described under the lanes below.) Pressing it separates the track, and the lane itself becomes the progress bar, for example “Separating the stems · 42%”, or “Waiting: 1 track ahead” while another track separates first. It fills with the vocals when it finishes. Euphoria never starts a separation by itself. Remove stems empties the lane again. If the vocals stem cannot be read, the lane says “Vocals not available” and pointing at it shows why.
The decks draw the same two lanes under each deck’s waveform, and the link there separates the track on that deck. The focus view draws them over a zoomed window, with a Sections lane beside them.
Key changes
When a track changes key, a strip under the lanes shows each stretch in its key’s colour with its Camelot code, aligned with the waveform. Point at a stretch to read its key and where it starts and ends. Silences between stretches stay empty. A track that stays in one key shows no strip, since its key is in the box above. For now the strip is also left out when the track’s key is none of its stretches or a stretch is shorter than 30 seconds, because such a timeline can contradict the key above it. The strip is the detector’s view, so it is also hidden while you have corrected the key, and comes back when you reset it.
Focus view
The focus view gives the selected track the whole window: its lanes on one time axis, the tracks it mixes into, and a place to plan the transition. It replaces the table and the inspector, and hides the sidebar while it is open.
Open it with the Focus button at the top of the inspector, or with Enter on a row (a double-click on a row plays it instead; the F key already stars a track, so it is not used). Esc or the Library button goes back to the library with the same track selected.
The header shows the title, artist, length, format and sound quality, with chips for the key (code and name), the tempo and the energy. A Grid chip appears only when the grid needs a look: none for a track without a beat grid, or edited when you set the tempo yourself. A detected grid is fine, so it shows nothing.
The timeline stacks these lanes, top to bottom:
- Overview, the whole track as a small waveform, with the part the other lanes show outlined. Click or drag it to move that window.
- Sections, coloured bands named Intro, Main, Breakdown, Drop and Outro, or Section on a track whose cues are numbered sections. They come from the track’s automatic cues (Start, Main, Breakdown, Drop and Outro, or Section 2, Section 3 and so on), and follow a cue you drag. The lane reads them through one small interface, so a better section detector replaces only that.
- Detail, a zoomed waveform of the outlined window, tinted by section, with the cue flags on top. Drag a flag to move its cue, as in the inspector: it lands on a beat, or on a bar with Shift. Double-click to add a cue, click to play from there, and drag with Command held to draw a loop. The + and − buttons zoom, Command and the wheel zoom about the pointer, and the wheel alone moves along the track. The waveform keeps 720 columns for a track, so the detail zooms in to a sixth of the track at most.
- Energy, the lane described under The lanes under the waveform, over the same window. Its tooltip names the time under the pointer.
- Vocals, Drums, Bass and Other, four thin rows, each with its name at the left, showing where each stem sounds, measured second by second from the track’s separated stems. With stems there is one Vocals row, the vocals stem’s own: the Vocals lane of the waveform view, which judges the same stem in 4 second steps against the track’s own vocal level, is not drawn here, so the two cannot disagree. A track without stems shows no rows and no label column: one card takes their place, “Stems not separated yet. Splits the track into vocals, drums, bass and the rest. Takes about a minute.”, with a Separate button. While the stems are being separated the card shows the same progress bar as the inspector, and so do the stem rows when they are on screen.
Hear some of the stems. Click the name of a row to hear only that stem: its name takes the accent colour while the others are struck through and dim, and their rows fade. Click it again to return to the full track. ⌘-click a name (Ctrl-click on Linux and Windows) to add that stem to the ones that play, or take it out. While every stem plays, ⌘-clicking one mutes just that one. Taking out the last stem that plays brings every stem back, and so does adding the last one that was off. A small line under the rows says what is heard, for example Solo: Vocals + Drums · Full track or Muted: Drums · Full track; Full track in it also returns to the full track. The track detail’s Acapella and Instrumental are the same choice seen from there: picking Vocals alone in the rows highlights Acapella, picking Drums, Bass and Other highlights Instrumental, and all four is Full track; choosing Acapella shows Vocals alone in the rows, and ⌘-clicking from there adds to it. Any other mix shows none of the three picked. While a track plays, going from one mix of stems to another changes the stem levels within about 10 ms, with no restart. Going from the full track to some of the stems starts the stems from the same moment, as choosing Acapella does, so it can take a moment. Nothing in it animates, so Reduce motion changes nothing. Choosing another track returns to the full track, or to Acapella or Instrumental when that was chosen in the track detail. The exports in the track detail are not affected: they save all stems, the acapella or the instrumental, whatever is heard. The clicks are tested in a headless window against the mixer’s gains; the sound of the switch is not tested with real audio output.
Every lane shares one playhead and one cursor. Point anywhere over the lanes and a single vertical line runs through all of them, with a line under them such as “2:51 · Breakdown · Energy 3 · no vocals · bass out”, built from the lanes that have data. The Layers menu shows or hides each lane, and the choice is kept in settings.json.
Mixes into, bottom left, lists the same tracks as Mixes well with in the inspector, in the same order with starred transitions first, and follows the same filter. Each row is 32 px high and has a star, the key, the title with the transition note or the artist after a dot, the tempo change with a Tempo chip, and the key relation in a column of its own, for example One step on the wheel or Wheel diagonal (point at it for “One step and a major/minor switch”), or Your mix for a transition you starred whose keys do not mix by the rules. The chip reads Easy for a change under 3 percent, Pitch move from 3 to 6 percent and Big jump over 6 percent, in a success, neutral and warning colour, never error red. The Vocals and bass overlap column plans the transition from the selected track into each row: a strip of up to 16 cells for the best window, coloured by what the two tracks do together (fine, both basslines, both vocals, not known), and a verdict, Clean, Vocals overlap, Bass overlap, or Stems needed when the stems of either track are missing. The plans are worked out off the main thread, two at a time, for the rows in view and the picked one, and kept in memory for the session, so scrolling stays smooth. A row reads Checking while its plan is made, and is left blank when the pair cannot be planned; point at the row for the reason. Euphoria never separates stems for this. Click a row to pick it for the plan, double-click to focus on it.
Loops
At the top of the focus view, next to the Library button, the Loop row loops the track you hear while it plays or is paused in the focus view:
- ½ and 1 beat, then 1, 2, 4, 8 and 16 bars. The loop starts on the beat of the grid at or before the playhead, so it lines up with the music, and the button stays pressed while it plays; press it again to leave the loop. A track without a beat grid loops from the playhead itself, with the length worked out from its tempo, or from 120 BPM when it has none. While a loop plays, another length makes the same loop that long from its start.
- ½× and 2× halve and double the loop from its start. If the playhead is past the end of a halved loop, playing moves back into it at the same place in the bar.
- Exit loop leaves the loop: playing goes on past its end without a break.
- Save loop keeps the loop with the track, named Loop 1, Loop 2 and on. Saved loops are listed above the cues in the Cues tab of the Plan card, with their start and end; click one to jump there and loop it, or × to delete it.
Draw a loop with Command held (Control on Linux and Windows): drag across the detail waveform and the loop plays between where you pressed and where you let go, each end on the nearest beat. Hold Option as well to place the ends anywhere. A plain click still plays from where you click, and a double-click still adds a cue. The loop shows as a tinted stretch of the detail and of the overview, with a grip at each end of the detail: drag a grip to move that end, onto a beat, or anywhere with Option. When the playhead is outside a loop you draw, move or click in the list, playing jumps to its start.
Keys: L loops 4 bars, or leaves the loop; ⌘← and ⌘→ (Control on Linux and Windows) halve and double it; Esc leaves the loop, and a second Esc leaves the focus view. Clicking or seeking outside the loop leaves it too, and so does closing the focus view.
The loop plays through the player itself, so the tempo control, key lock, the key shift and the stems all apply to it as to the rest of the track. Its length is exact to the sample: the end of each pass crossfades into the start over 5 milliseconds, so the join neither clicks nor leaves a gap. The sound is decoded about a second ahead; when a loop is set or changed after that sound was already decoded, playing goes on from the same moment with a fade of a few milliseconds instead of a cut. Saved loops are kept in the analysis cache next to your cues, under the content of the file, so they survive analyzing again, moving the file and writing tags. Saving a loop does not turn the automatic cues into your own. Saved loops go out with your cues: as memory loops in a rekordbox XML export and as loops in a Traktor NML export, both with Cues on, and as Serato saved loops when writing Serato cue points. The Engine DJ and VirtualDJ exports do not write them yet.
The loop’s samples are tested against generated audio: a ramp whose every sample names its frame shows each pass is exactly as long as the loop and that the stems loop together, and a steady tone shows the join never clicks or falls silent, also at another tempo with key lock on. The buttons, the keys, a drawn loop and its grips, leaving, saving and playing a saved loop are tested in a headless window. How a loop sounds on real music through a real audio output is not tested.
Change the tempo of the playing track
Next to the BPM chip, the header has a tempo control for the track you hear:
- A field with the target tempo, such as “124.0 BPM”. Click it and type a tempo, with a point or a comma (“124,5”), then press Return; or use the up and down arrows at its edge (1 BPM, or 0.1 with Alt), the Up and Down keys while it is open, or scroll over it. It is the same field as the metronome’s.
- A readout of the change, such as “+3.3%”.
- Reset, which goes back to the track’s own tempo.
- Key lock, on by default: the pitch stays where it was. Turn it off and the pitch follows the speed, as on a turntable.
The range is 16% either way of the track’s tempo, the usual range of a pitch fader. A tempo outside it is clamped to the nearest end, and the tooltip says so. The rate changes while the track plays, with no restart; there is a brief gap of a fraction of a second as sound already prepared at the old tempo is replaced. With key lock on, the sound goes through the same Signalsmith Stretch time stretcher that the decks use; with it off, it is resampled. At exactly 100% the sound is not touched and nothing is delayed.
While the tempo differs from the track’s own, the BPM chip shows the target with the original beneath it, and the player bar shows “120.0 → 124.0 BPM” beside the title. The playhead, the time labels, cue flags and every lane stay in the track’s own time, so a cue is still where it was. The metronome follows the target tempo, see Metronome.
This changes playback only: the tooltips say “Changes playback only; the file is not changed.” Nothing is written to the file, the tags or the cache, and the tempo goes back to the track’s own as soon as another track is selected or played. Stems are meant to play at the same tempo, each stretched on its own; that path is built but not tested with real stems. The tempo of a track without a detected tempo cannot be set. The sound quality of a stretch is not measured here: the tests check the pitch of a steady tone and the position against the time heard, not how drums or voices sound at 16%, so listen and report anything off.
Plan, bottom right, has three tabs. Transition plans the pick, see Plan a transition. Mashup opens the decks in mashup mode. Cues is the cue list of the inspector, with the track’s saved loops above it.
Plan a transition in the focus view
Pick a track in Mixes into and the Transition tab gives the best window of the plan in a sentence, for example: “Mix out of this track’s Outro (5:24) into Night Orbit’s Intro. 32 bars, no vocals on either side, bass swap at bar 17. Night Orbit plays at 124.0 BPM (+1.6%), key 9A, one step up the wheel.” Under it, a small strip shows A and B as bands of sections on one grid of bars, with the overlap row under them and the window outlined, then Vocals and bass overlap: and its verdict, or the link Separate stems to check, which starts separating the first track without stems, A before B; separations run one at a time, so the link stays until both are done. The plan is the one euphoria plan makes, see Planning a transition; the sections are read from the cues the track shows, so cues you edited count.
Three buttons act on the best window, with the same words in the planner, and the link Open planner → sits in the header of the Plan card:
- Set cues on A and B writes the plan’s cues as your own cues: Mix out and Mix out end on A, Mix in, Bass swap and Vocals in on B, each on the first free hot cue pad. The cues a track already has stay, and a cue of the same name is replaced, so pressing it again does not pile up copies. One undo, the undo in the Cues tab, takes back the cues of both tracks together.
- Open on the decks opens the decks, loads A on deck A and B on deck B, each paused on its downbeat at the start of the window, with sync on so that B follows A’s tempo, and leaves the planner and the focus view, for mixing by hand. Play deck A, then deck B: B starts on the next downbeat of A. The decks header then shows ← Back to plan, and Esc does the same: it returns to the planner with the same two tracks, the same window and the page scrolled as it was. The decks stay loaded but are paused, because while the planner is open its own transport is the only thing that plays. The load is not tested with real audio output.
- Save as favorite transition marks the transition from A into B as a favorite with the window’s sentence as its note.
- Open planner →, a link in the card header, covers the focus view with the planner. Esc, or the Focus view button, goes back.
The planner is one screen. On the left is A, the track you came from, and under it the tracks that fit after it, ranked by the same ranking as Next after in the library (same Keep, Lift and Drop, same pills for the key relation, the tempo move and the energy change, and the same filters, so the filter bar narrows it). Click a track and it becomes B: its best window is worked out and the transition plays at once, A from 8 bars before the mix point into B at the plan’s tempo. Up and Down move to the next or previous track and play it the same way, so you can hear B after B; Space stops and starts. On the right is the timeline, from top to bottom:
- A transport: Play the transition, Play A, Play B and Stop. The transition plays A from 8 bars before the mix start, then B comes in on the planned bar, on A’s downbeat, with B time-stretched to the plan’s tempo (key lock on, the same stretch as the decks), and an equal-power crossfade runs across the window. Play A and Play B play one track from the same place, B at the plan’s tempo. The sound is the decks’ own mix, so the decks open behind the planner and Sync is switched off while it plays, and given back when it stops. A line follows the sound across the timeline. Click the timeline and it plays from that bar, or, when stopped, the line waits there. Space plays and stops. The line moves under Reduce motion too: it is information, not decoration, and it is drawn from where the sound is, not animated.
- A bar ruler. Bars are counted from where B comes in, as the hint on the ruler says: Mix starts at the start of the window, bars before it counted back (bar -16, bar -32) and after it forward, then B’s drop where B’s drop section starts, when it is in view, and A ends. At the left, A at 5:09 is the time in A under the line, or where playing would start.
- Both tracks on that grid, each with its section bands and its Vocals, Bass and Drums lanes, one cell per bar. B appears at the mix start and goes on after A ends. A lane whose stems are not known says Not separated yet in the lane, and is never drawn as present. A lane that is full from start to end on a track that has stems is real data: the stem was above the presence threshold in every bar. It can also be bleed from the model, which the thresholds do not tell apart.
- A line, Where both tracks have vocals or basslines at once. Pick a window with none., and the Vocals and bass overlap row under it, with a legend: Fine, Both basslines, Both vocals, Unknown and Best place to mix, the outline.
- When a stem is missing, one line: Vocals and bass overlap isn’t checked yet., with a button Separate stems of B (and of A) next to it. It shows the progress of the separation in place, with Cancel, and the reason when it fails. The lanes and the row fill in when it finishes, without leaving the planner. A track asked for while another separates waits its turn. Cancel takes a waiting track out of line; the separation that runs cannot be interrupted, so it finishes in the background and keeps its stems in the cache, where asking again finds them at once.
- Small numbered markers above the ruler for the suggested windows, at where their mix point lies. Press one to jump there; if the transition was playing, it plays again from 8 bars before. The tooltip names the window, for example “Main (6:14) into Drop”, with its bars and key relation. The best one is chosen automatically when you pick B.
- Drag B: press on B’s rows and drag left or right. The mix point moves in whole bars of A (drag right to bring B in later) and the plan is worked out again for that place: the overlap row, the line below and the cues follow, and it snaps onto a suggested window when it reaches one. Sound stops while you drag and the transition plays again from 8 bars before the new mix point when you let go. Pressing B without moving does nothing.
- Locked transitions. Dragging B to a new mix point, or pressing the marker of a window, locks the transition of A into B where you put it. The planner opens on it the next time you plan the pair, and rendering a set keeps it instead of planning that transition again. The card under the timeline then says Placed by hand and locked: rendering a set keeps it., with Unlock, which gives the transition back to the plan and shows its best window. Locks are kept with the playlists in
playlists.sqlite3, by the content of each file and its path, so they survive a move or a tag write. - One line: “At 6:14 in A (Main), B comes in from 2:43 · A ends at 6:45”, and the buttons Save as favorite transition, Set cues on A and B and Open on the decks. Save as favorite transition marks the transition from A into B as a favorite with the window’s sentence as its note.
When the tempos are too far apart for a deck, the planner says so in words: “Tempo out of reach: Night Orbit would have to play at 2.40 times its speed to match Low Tide, and a deck plays between 0.5 and 2 times.” A track without a beat grid says so in the same way.
The energy and the stem levels the plan reads are measured once off the main thread and kept in the plan-signals folder of Euphoria’s data folder, so a second plan of the same track is quick. The look of the planner on a real display is not tested; the headless window tests what it shows and what its buttons do. The transport is tested by the commands it sends the decks and the bars it opens them at, not by listening to real audio output.
Not tested outside the headless window: the look on a real display, dragging B with a real mouse (the tests drive the same drag steps by calling them), and the lanes on tracks over an hour long.
Favorites
Star the tracks you reach for, and mark the transitions you know work: a track into another that you tried on the decks or played out and want to find again.
Star a track
- In the table, a starred track has a small filled star before its title. The star button with the other row actions shows on the row under the pointer and on the selected row. Click it to star the track or take the star off; the click does not change the selection.
- Press S or F, or choose View > Star or Unstar Selection, to star the selected tracks. When all of them are starred already, F takes their stars off. S and F type a letter when a text field has the keyboard.
- The right click menu of a row has Star or Remove star, for the selected tracks.
- The star at the top of the inspector, beside the track’s name, stars the selected track.
- Each deck has a star beside its track’s name.
Favorites in the sidebar shows the starred tracks, in the order you starred them. Search and sorting work there as in a playlist.
Favorite transitions
A favorite transition is one track into another: playing the second after the first mixes well. It has a direction, so a transition from A into B is not one from B into A, since a mix that works one way often does not work the other (an energy lift played backwards is a drop).
- On the decks, with a track on each, Save transition A → B under the decks marks the transition from deck A into deck B. Click it again to take the mark off. Once it is marked, click Add a note beside it to write how the mix goes, for example where to bring the second track in, and press Return. An empty note takes the note away.
- In Mixes well with in the inspector, the star at the start of a row marks the transition from the selected track into that one.
Marked transitions come first in Mixes well with, in the order you marked them, with a filled star, and their note shows when the pointer rests on the row. A marked transition is listed there even when its keys do not mix by the rules, since you found that they do; its relation then reads Your mix.
In Next on deck B, a marked transition out of the track on deck A moves up the ranking: it counts as much as four steps of key relation, so a mix you know beats one that is only smoother on paper, unless its tempo or energy is far off. A filled star marks it. It still has to mix in key and tempo to be suggested there.
Export your favorites
Over the starred tracks, Export to rekordbox and Export M3U8 ask where to save them and write them as a playlist named Favorites, in the order you starred them, the same way a playlist export does. The line also counts your favorite transitions. Transitions and their notes are not part of the export: rekordbox XML and M3U8 have no place for them.
Where favorites are kept
Favorites are kept with the playlists in playlists.sqlite3, so clearing the analysis cache never touches them. Like a playlist entry, each starred track and each side of a transition is kept by the content of its file and the path it was last seen at: a favorite survives a move or a rename once the app has seen the file in its new place, and follows Euphoria’s own tag writes and undo, the way corrections and edited cues do.
Write tags
The app can write the key, tempo and energy it found into the files themselves, with the same safety as euphoria tags write: you see every change before anything is written, and one step puts the old tags back.
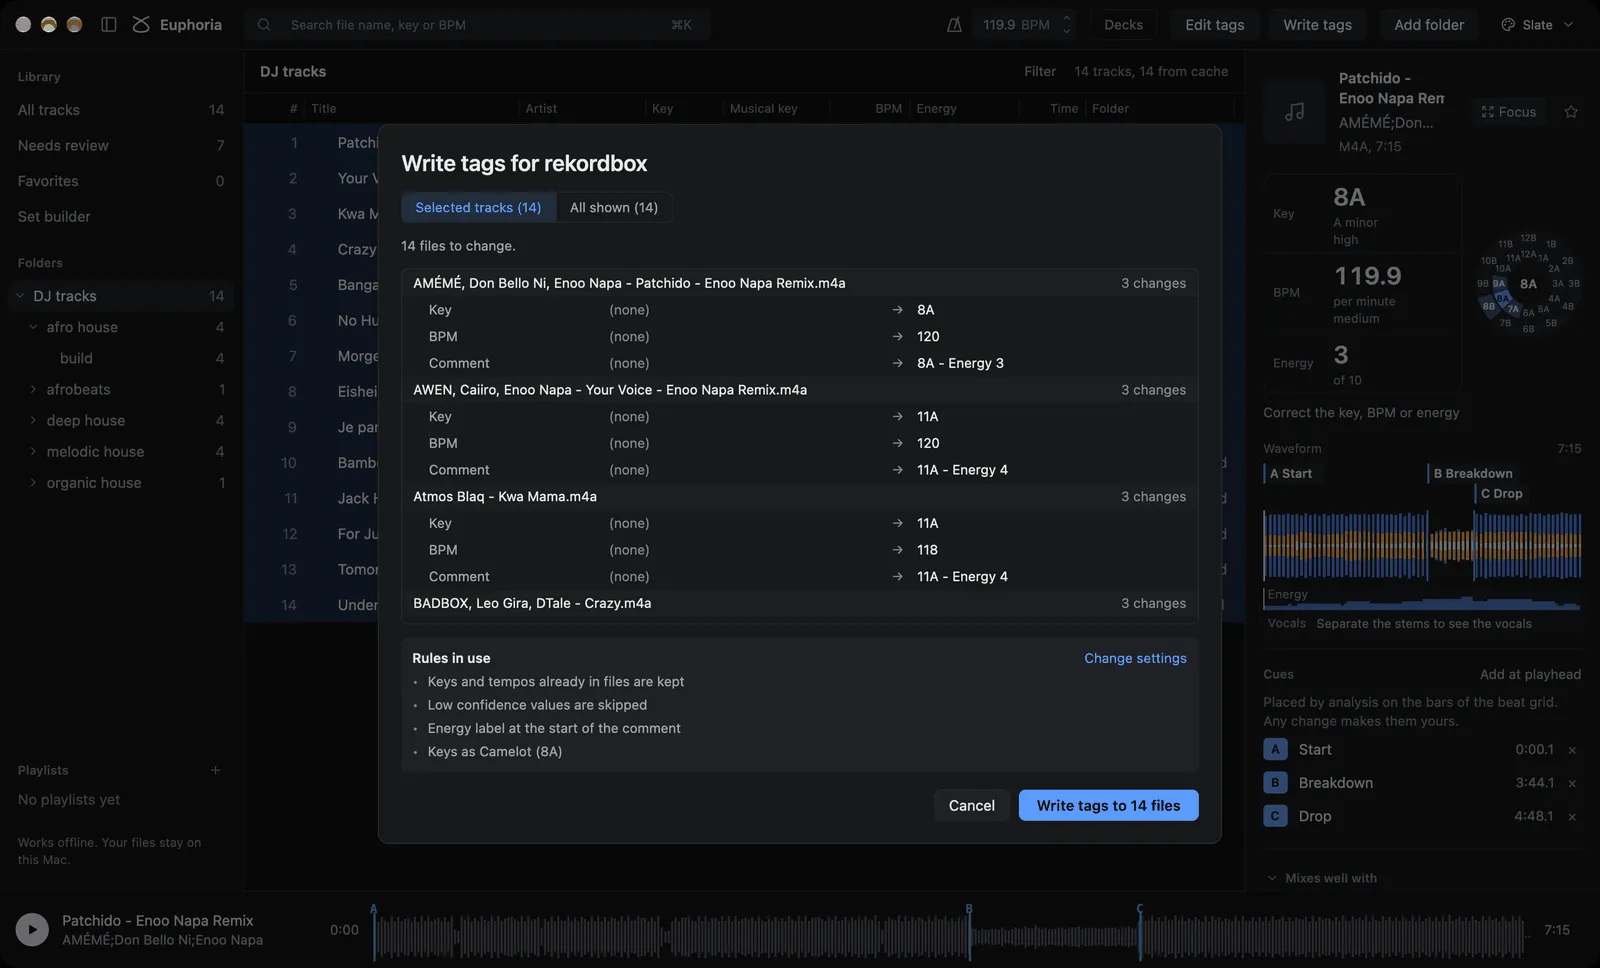
- Select the tracks to write, or choose a folder in the sidebar.
- Click Write tags in the toolbar, or choose Tags > Write Tags… (Command Shift T). The preview is titled with the DJ program the tags are written for, such as “Write tags for rekordbox”; choose it in the settings.
- The preview lists every file that would change, each field by name (Key, BPM, Comment) with the value it has now and the value it would get; rest the pointer on a name to see the tag frame, such as TKEY. Under the list, Rules in use gives three or four short lines from your settings, such as “Keys already in files are kept”, “Low confidence values are skipped” and “Energy label at the start of the comment”, with a Change settings link that opens the settings over the preview. Each change you make there works the preview out again at once, so when you close the settings it shows what the new choices write; while it updates, the list dims, the line above it says “Updating for the new settings…”, and the write button cannot be clicked. Selected tracks and All shown switch between the selection and every track the table shows, such as a whole folder. Files that already hold the values, tracks not analyzed yet and files that cannot be written safely are counted or listed with the reason.
- Click the button, which says what it does and how many files it touches, such as Write tags to 18 files. Nothing is written before that, and Cancel or Escape closes the preview without writing. A key or tempo left as it is, because the file already has one or because it is rated low confidence, is listed in the preview with the reason. When rekordbox, Serato DJ, Traktor, Engine DJ or VirtualDJ is running, the click first shows a strip that says the program may lose the change; Write anyway goes on.
- The app shows how far it has got. When every file was written, the window closes the preview and ends with a toast such as “Wrote key and BPM to 18 files”, with Undo. When some files could not be written, or the log, cache or playlists could not be updated, the preview stays open and lists them with the reason. Unwritten files are left as they were.
Undo in the toast (or Command Z while it shows), Tags > Undo Last Tag Write… or the button in the settings puts back the exact tags the last write replaced. The menu and the settings ask first; the toast does not, because it is the question. The app and euphoria tags undo share their backups, so either undoes a write the other made.
Toasts
Every write ends with one short toast at the bottom centre, above the player bar, that says what changed:
- Tag writes, automatic batches and tag editor saves: “Wrote key and BPM to 18 files”, with Undo and its shortcut, Command Z. Undo is the same undo as Tags > Undo Last Tag Write…, and after it the toast says “Put the old tags back in 18 files”.
- Exports to a DJ program or an M3U8 file, stem exports, shifted copies and mashups: “Exported 575 tracks to rekordbox XML”, with Show in Finder in place of Undo. An export to rekordbox adds a second line, “In rekordbox, open the XML view to import it.”
- Saving a set as a playlist: a toast with no action, since nothing was written outside Euphoria.
- Rescanning the folders: “3 new tracks, 1 removed”, or “No changes”, with no action.
The toast slides up and fades in over 180 ms, stays 10 seconds, and waits while the pointer is over it. One toast shows at a time and a new one replaces the old; replacing a write’s toast takes its Undo away, though Tags > Undo Last Tag Write… still works. With macOS Reduce motion on, it appears at once. Command Z runs a toast’s Undo only when no text field has the keyboard; in a field it stays that field’s own undo, and without a toast with Undo it undoes the last cue edit.
Errors do not become toasts. They stay in the strip at the bottom with Dismiss, and the strip that holds tracks while a DJ program runs stays a strip, since it needs a decision. The toast sits above the player bar and the strips below it, so they never cover each other. Not tested: toast placement on a very narrow window.
Cue markers: with the Cue markers setting in How tags are written on, the write also adds each track’s cues and beat grid where Serato DJ, Mixxx and VirtualDJ read them. The cues you edited in the app go in on the pads you gave them; memory cues, ones on no pad, are left out. The preview shows the cue points and beat grid each file gets, and below it lists the files where a cue went to another pad, where cues were left out, where your own Serato beat grid is kept, or where a file gets no Serato data. Those files still get their key and other tags. Undo this write puts these back byte for byte, Serato fields included. Cue points and beat grids for Serato explains what is written and how to bring it into Serato.
A key or tempo you corrected is written in place of the detected one. Each file written, and each file put back by an undo, is recorded in the analysis cache as it is, so it is not analyzed again the next time the app starts, and its corrections stay with it.
Prepare files
Right click the selected tracks and choose Prepare files… to write copies that play evenly on a club system. The sheet has the loudness target (-14, -11, -9 or -7 LUFS), the true-peak ceiling, whether to correct tuning, what MP3 and AAC tracks become (FLAC or WAV, never lossy), and where the copies go: next to each original, or in a folder you choose.
Under the options a table shows what each file gets, from the same measurement a euphoria prepare --dry-run makes: its loudness before and after, the gain, the dB of limiting, the tuning change, and notes such as Gain capped (the track would need more than 3 dB of limiting, so it gets less gain) and Clipped (it already has clipped passages, which are reported and not repaired). Prepare writes the copies with a progress bar, and a toast ends it with Prepared 12 files and Show in Finder. The originals are never changed and no file is overwritten.
What to do can be Tag loudness only (ReplayGain): the sheet then writes ReplayGain track gain and peak into the tags of the originals and nothing else, with no copies and the audio untouched. Listen: original and prepared, under the table, plays 20 seconds from the middle of the selected file in a loop, first its prepared version and then, with the Original and Prepared buttons, the original, switching at the same position; both are at the same loudness, so you hear the limiter and the tuning change and not the level. The comparison is made in memory and writes nothing. Each run is recorded in a manifest next to its files, and Revert last run in the sheet removes the copies the last run of the session wrote, or puts back the tags it changed, keeping any file that changed since. The guide explains each option. The name suffix is fixed to (prepared) in the app; the command line can change it.
Playlists
Playlists are where you build a set: a folder holds the tracks you own, a playlist holds the order you will play them in.
- Make one with the + beside Playlists in the sidebar, under the folders, then type its name and press Return. Right click tracks in the table and choose New playlist from selection to start one from them.
- Add tracks by dragging them from the table onto a playlist in the sidebar, or with Add to playlist in their right click menu. A track is in a playlist once; adding it again changes nothing.
- Rename a playlist by double clicking it, or from its right click menu. The menu also gives it a Label, one emoji to tell it apart, and Delete playlist, which leaves the tracks in the library.
- Reorder playlists by dragging them up or down the sidebar.
Click a playlist to show its tracks in the table in their order, with their place in the # column. Drag rows to move them; a row dropped on another goes just above it, and a whole selection moves together. Remove from playlist in the right click menu takes tracks out. Search and sorting work as everywhere else, but sorting is only a view: the playlist keeps its order, and clicking the # header goes back to it. While the table is sorted or searched, rows cannot be dragged to a new place.
A set at a glance
Above a playlist’s table, a line shows it as a set:
- The key path: each track’s key in play order, in the notation you chose. A
›between two keys is a compatible move; a red×marks a step that is not, the place to look for a smoother order or a key change you meant. - The tempo range, from the slowest track to the fastest.
- The energy flow: a small line of each track’s energy in order, rising from 1 to 10.
The count beside the name says how many of the playlist’s tracks are not in the library, for example after their folder was removed; they come back when the folder is added again.
Export a playlist
The rekordbox and M3U8 buttons after Export, at the end of the line above the table, or the playlist’s right click menu, ask where to save the playlist and write it there:
- rekordbox writes a rekordbox XML file holding the playlist’s tracks and one playlist in its order, with their keys, tempos and energy, as
euphoria export rekordboxdoes. Export to rekordbox explains the import. - M3U8 writes the playlist for nearly any other program: Serato, Traktor, Engine DJ, VirtualDJ, Mixxx or a music player. It holds the tracks’ paths, lengths and names, not their keys; write the tags for those programs to see the keys.
Tracks not analyzed yet are left out of a rekordbox export, and the app says how many were. Every file is read and compared with the track that was added before it is exported, so a file replaced at the same path by other audio is left out too, with a note saying so.
Where playlists are kept
Playlists are kept in playlists.sqlite3, beside the analysis cache in the data folder. Each track is kept by the content of its file, like a remembered result, together with its path. A file moved or renamed is found again once the app or euphoria analyze has seen it in its new place, and only when the file there holds the same content. Euphoria’s own tag writes and undo keep playlist identity in step with the rewritten file; an unverified external replacement is still left out of exports. Playlists live in their own file so that clearing or deleting the cache never touches them. The command line lists them with euphoria playlists and exports one by name.
Build a set
Set builder in the sidebar, View > Set Builder or Command Shift B (Control Shift B on Linux) opens a page that orders tracks into a set along an energy curve, with every mix in a compatible key and small tempo steps. It is the same search as euphoria set build, which explains how it chooses.
- Draw the curve. Drag across the chart: higher is more energy, from 1 at the bottom to 10 at the top. The stroke is smoothed when you let go. Warm up, Peak time and Journey put a preset curve back.
- Choose the pool. All tracks, one of the folders you added, or a playlist. The pool starts as what the library showed when you opened the page.
- Set the length with − and +, from 2 to 60 tracks, then Build set or press Command Return (Control Return on Linux). The length starts at 20, or at the size of the pool when it is smaller.
Once the set is built, the chart is its energy journey. The curve you drew stays as a line, and each track of the set is a bar at its place with its energy as the height, so a bar that reaches the line is a track that fits there.
- A bar more than a point from the curve (the tolerance the builder works to) is tinted warm. A locked track has a small lock on its bar, and the track playing is in the accent colour.
- Point at a bar for its title, key, BPM, energy and what the curve wants there, such as “wants 4.9”. Click a bar to select its row (double-click plays it). Click between two bars to play that transition: the last 20 seconds of the track before, then the next track from its start, as Play transition does.
- Under the chart, Warm-up, Peak and Close mark the stretches of the curve, found from its shape: the peak is where it stays within a level of its highest point, and the other two are the rise before and the fall after. A curve that is flat, or has no rise or fall, gets no names. The times along the bottom are how far into the set each quarter starts.
- Drag on the chart above the bars to draw the curve again.
Under the chart one row of chips sums the set up: how far the furthest track is from the curve (“Energy within 1.9 of the curve”), how many rules it breaks (“2 rule breaks”: a key clash, a tempo step over 5 BPM or an artist twice in a row), and its length (“1 h 32 · 14 tracks”). A chip is tinted warm when something falls short, and a fourth chip appears when the pool was too small for the length asked. Show details lists the average distance from the curve and every place the set falls short, each with the reason it counts.
In the table, a row that is off the curve or reached by a mix that breaks a rule has a thin warm bar at its left. An energy off the curve is tinted and reads “6 (wants 4.9)”, and the key move, the tempo step or the title of a row that breaks a rule shows the rule when you point at it. Each row shows the key move and tempo step from the track before, and the track’s energy against the energy the curve asks for there.
- The padlock pins a track. A locked row cannot be removed (Remove is greyed, with “Unlock to remove”, and Delete skips it with a notice), and the arrows are off for it and for the rows beside it, so nothing moves it. The lock is a small padlock button at the start of the row; it is tinted and in the accent colour while the track is locked, and clicking it again unlocks the track. Build around locked tracks fills the rest of the set again, for a new curve, length or pool, around the tracks you locked.
- The arrows move a track one place, and Remove takes it out (or select a row and press Delete). The set is explained again at once: the moves, the steps and the curve follow your order.
- Add tracks. In the library, point at a track and press its + button, or select tracks and press A: they join the end of the set, unlocked, and the set is explained again. A track already in the set is not added twice, and a set holds at most 60 tracks. The play buttons on set rows look like the row buttons of the library table.
- Play the set. Point at a row and press its play button, double-click the row, or select it and press Space: the track plays from the start in the player at the bottom of the window, and the playing row is marked with the accent colour and a pause button. Press the button again, or the player’s own button, to pause and resume. When a track ends, the set goes on with the next track in set order, not library order, and stops after the last one.
- Play transition on a row plays the last 20 seconds of the track before it, then goes on into that track from its start. The 20 seconds is fixed: this preview is a plain one after the other with no crossfade. To hear the planned transitions, use Render mix… or the transition planner.
- While the decks are open they hold the player, so the play buttons show “Close the decks to use the track player.” and do nothing.
- Render mix… asks where to save the set as one continuous mix (a name ending in
.flacwrites FLAC,.mp3a 320 kbps MP3 with a chapter per track, anything else WAV), then renders it in the background, aseuphoria set renderdoes: each track blended into the next at a section start, beatmatched with its key kept, and the transitions you locked in the planner kept as they are. The button becomes a progress bar with Cancel, which stops the render and writes nothing. When it is done, a toast says so with Show in Finder, and a CUE sheet, a tracklist and chapter lines are written beside the mix asNAME.cue,NAME.tracklist.txtandNAME.chapters.txt. The sections are read from the cues each track shows, so cues you edited count. Not tested on a real display: the look of the progress bar; the headless window tests the render, its files and Cancel. - Check transitions, under Show details, plans the mix of the set without rendering it and lists each transition with why it is placed there. Under a blend where both tracks would sing at once it says so in the warning colour, with a button for each fix that applies: move the blend to a window where only one sings (which locks it there), cut the outgoing vocals with its stems, or swap the bass early and fade the outgoing track out before the other sings. See When both tracks sing at once. Vocals are only checked for tracks with separated stems.
- Save as playlist keeps the set as a playlist named after its curve, such as “Set: Journey, 20 tracks”, in the sidebar with the others. Export playlist… saves it first if needed, then asks where to write the file, as an M3U8 playlist.
A pool with more than 4,000 tracks that have a key, a tempo and an energy is refused: choose a folder or a playlist.
Edit tags
Select one track or thousands and click Edit tags in the toolbar, or choose Tags > Edit Tags… (Command I), to edit their title, artist, album, genre, year, track number, comment, grouping, key and BPM fields.
- Each field shows the value the selected tracks share. When they differ, it is empty, shows mixed and is marked differs; leave it empty to keep each track’s own value, or type to give them all one.
- Type in a field to change it. Emptying a field that has a value removes it, and Remove beside a field removes it from every track; click Keep to take that back.
- Change text in one field works on one field at a time: Find and replace (with Match case for capital letters), Add prefix, Add suffix, Remove prefix and Remove suffix. Choose the field under the tool and type the text.
- Fill from analysis: when the key or the BPM field is empty in the files and Euphoria has analyzed the track, the field shows the analyzed value dimmed, such as “124 (from analysis)”, with Use beside it, and Fill from analysis at the top types the values into every such field. The key is spelled in the Key notation of the tag settings and the tempo as the DJ program there writes it. Nothing is written until you choose Preview changes and Write. With several tracks selected, a value is suggested only when they all have the same one, since one typed value goes to every selected track.
- Preview changes shows the same preview as writing tags: each file with each field’s value now and the value it would get. Click Write to write them, or Cancel.
The edit is written with the same safety as a tag write and shares its backups, so Undo this write, Tags > Undo Last Tag Write… and euphoria tags undo put the old tags back. The titles and artists in the table follow the edit. A comment or a grouping keeps the key and energy label a tag write put there, as euphoria tags set explains, and the comment field shows only your own text. The key and BPM fields are the tags in the files; the key and tempo Euphoria detected stay as they were.
Export the library
File > Export Library… opens a sheet that exports every track of the library, or only the tracks the table shows, to a DJ program. The analysis, corrections and cues you edited in the app are what is exported; nothing is analyzed again.
- Pick the program: rekordbox (an XML file to import), Traktor (an NML file to import), Engine DJ or VirtualDJ (the program’s own database, edited in place), or any program (an M3U8 playlist).
- Pick the tracks: the whole library or the tracks shown.
- Set the options the program has, as in
euphoria export: the beat grid, cues, a playlist per folder (rekordbox and Traktor), and where the key and energy label goes (Engine DJ and VirtualDJ). Keys are spelled in the notation chosen under Settings > Key notation. The sheet shows it as a line, such as “Keys as Camelot (8A) · Change in Settings”; the link opens the settings at that choice. The command line keeps--key-notation. - Choose the file to write, or the Engine Library folder or VirtualDJ
database.xmlto edit. The app proposes the ones it finds in your home folder. - Review checks everything and shows what would be written. It writes nothing. Export then writes, and the result appears in the notice strip.
With Cues on, for rekordbox, Engine DJ and VirtualDJ, Colour cues by energy colours each automatic cue by the energy of its section, blue for calm up to red for intense. Your own cues keep their pad colour. Turn it off to keep the program’s own colours. It is the same setting as in Settings, so the choice is remembered. Traktor colours a cue by its type, so the sheet does not offer it there.
For rekordbox and Traktor, cues need the beat grid and your own collection file (rekordbox: File > Export Collection in xml format; Traktor: collection.nml). Tracks that already have cues there are left out of the file so importing it cannot change them, and the export is refused when cued tracks of that collection match no file on this computer, unless you tick the box that allows it. The file is never written over your Traktor collection.
Engine DJ and VirtualDJ keep every safety of the command line, because the app calls the same code: a copy of the database is saved first and its path is shown in the review, the export is refused while the program is running, an Engine DJ library whose schema version Euphoria was not checked against is refused, and tracks with cues of their own in the program keep them.
The export runs off the main thread, but it has no per-track counter: the sheet says whether it is checking or writing and cannot be closed meanwhile.
The headless interface tests cover the sheet opening, a rekordbox export of a small fixture library, and the refusal of an Engine DJ database of an unknown version or while the program runs. The Engine DJ and VirtualDJ writes themselves are tested in the core, not against the real programs, and the file dialogs have not been checked by an automated test.
Settings
Open the settings with Euphoria > Settings… (Command comma), or choose Change settings in the Write tags preview, which keeps the preview open underneath and updates it as you change the options.
How keys and tempos are shown:
A choice of one among several, such as the key notation or the DJ program, is a joined control with the chosen part tinted with the accent. An on/off setting is a row with its name, a line on what it does, and a switch that slides when you click anywhere on the row; the switch jumps instead when the system asks to reduce motion. Only the one main button of a window is filled with the accent.
| Setting | Choices |
|---|---|
| Key notation | Camelot (8A), musical (Am) or Open Key (1m). One choice for everything: the table, the track detail, the mixes and the key timeline, the keys and labels written to tags, and the exports. The wheel keeps Camelot codes. Search finds a key in any of the three. Older versions asked in two places, one for what is shown and one for the tags; when the two differed, the tag choice is kept, because it changes your files. |
| Tempo range | House and techno, 90 to 180 (the default); hip hop, 70 to 140; drum and bass, 120 to 200; or a custom range of whole beats per minute, at most an octave wide, such as 80 up to 160. A track counted at half or double speed moves into the range. Nothing is analyzed again, and tags are written with the tempo as shown. A custom range that cannot be used is explained under it, and the last range that worked stays in use. Choosing the range says more. |
| Stage column | Adds a Stage column to the track table: warm-up, build or peak. Off by default. |
| Show matching keys on the wheel | Whether the Camelot wheel marks the keys your key moves reach, each in the colour of its move. On by default. |
| Key moves | Right under it, the moves the wheel, the Next list and Mixes well with use, each a switch after its colour on the wheel, with a line from 8A: Same key (8A to 8A), One step on the wheel (7A or 9A), Relative (8B), Wheel diagonal (7B, or 9A from 8B), Energy boost (10A), Mood change (11B) and Semitone boost (3A). They are the same saved moves as in the wheel’s menu and Narrow the suggestions, so a change in one place shows everywhere at once. Reset to default moves goes back to same key, one step and relative. All key settings… in the wheel’s menu opens the settings here. |
How the metronome sounds:
| Setting | Choices |
|---|---|
| Sound | Classic click, Woodblock, Hi-hat or Beep. Choosing one plays a click of it. |
| Volume | 20% to 100%, in five steps. |
| Accent | Whether the first beat of every bar of four is higher and louder. On by default. |
How tags are written. Every setting has one short line under its name; where there is more to say, it is in a tooltip on the i beside the line.
| Setting | Choices |
|---|---|
| After analysis | Write key and tempo after analysis (on) writes each newly analyzed track’s key and tempo into its file with the choices below, in batches, never while a DJ program runs, and with Undo. Writing tags automatically after analysis explains the safety rules. |
| DJ program | rekordbox, Serato, Traktor, Engine DJ, VirtualDJ, Mixxx, or any program. Tags are written to the fields that program reads; Use Euphoria with your DJ program lists them. |
| In your files | A box at the top of Writing tags that stays in view while you scroll through the options, and shows, live, what the choices write: for one track, each tag field that would change, such as the comment, key and BPM, with the key and energy label in the accent colour. A row that an option turns off stays in place, struck out, with why, such as “BPM · not written” with Write the tempo off, or “Key · kept as it is in the file” with Keep keys and tempos already in files on. It reacts to the program, the notation, the label place, Write the tempo, Keep keys and tempos already in files, Write low confidence values and Write cue markers. Under the rows, Would change in your library: 12 of 18 files counts the files the same choices would change, worked out in the background from the same plan as a write. It uses the selected track when it has an analysis and says Selected track; otherwise it uses a built-in example (8A, 128, energy 7) and says Example. Text a field already holds is shown as “Your comment” or “Your grouping”, so the box shows where the label goes without displaying your own notes. It is worked out by the same code as writing tags, so it never disagrees with it, and it writes nothing. With Write cue markers on it adds a line saying Serato DJ, Mixxx and VirtualDJ read them, and for rekordbox and Traktor, which do not read cues from files, it points to File > Export Library…. |
| Energy label | At the start of the comment, at its end, at the start of the grouping, or nowhere. Until you choose, it follows the program: nowhere for any program, the start of the comment for a DJ program. Settings saved by earlier versions keep a label you chose; the old default with any program is read as no choice. | | Existing key and tempo | A key or tempo a file already has is kept, so a correct tag is never replaced by a guess. The switch Keep keys and tempos already in files (on) keeps them; turn it off to replace them with Euphoria’s. A value Euphoria wrote earlier is still updated. | | Low confidence | A key or tempo rated low confidence is left out and listed in the preview. The switch Write low confidence values (off) writes them. A key or tempo you corrected counts as high. | | Tempo | Whether the tempo is written. Choosing Serato unticks it, because Serato detects the tempo itself only for files that have none; you can tick it again. | | Cue markers | Whether each track’s cues and beat grid are written as Serato cue points, which Serato DJ, Mixxx and VirtualDJ read. Off by default. Your edited cues go in on their pads; memory cues are left out. WAV and Ogg files get none. | | Colour cues by energy | Whether each automatic cue is coloured by the energy of its section, blue for calm up to red for intense, in cue markers and in File > Export Library…. On by default. Your own cues keep their pad colour. Off keeps the colours each program gives its pads. |
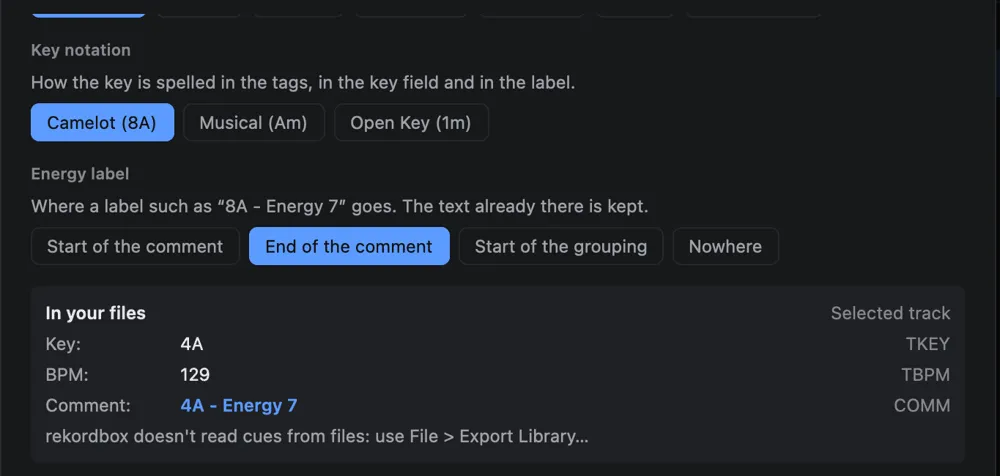
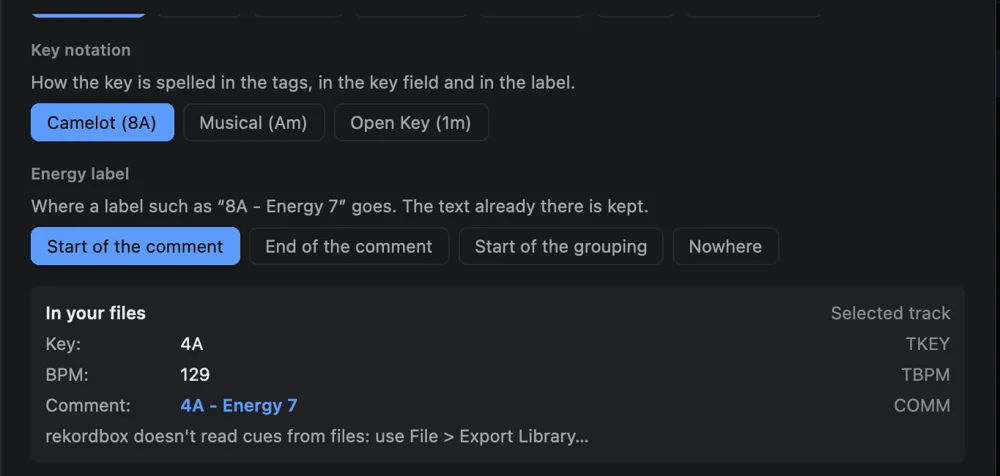
When a file fails
A file that cannot be analyzed stays in the table with Failed in its key column and is counted under Needs review. Select it to read the reason in the inspector, where Analyze again tries it once more. The other files carry on. A file that is no longer there is not a failure; see Missing files.
Missing files
A track is missing when its file is no longer where it was: moved, deleted, or on a drive that is not connected. When the app opens, each track of a playlist or a favorite whose file is gone is first looked for where the analysis cache last saw the same audio, and followed there. A track found nowhere is added to the library as missing. A file that disappears while the app runs becomes missing too, not failed.
A missing track shows Missing in its key column and is listed under Missing files in the sidebar, not under Needs review. The inspector says where the file was.
To point a missing track at where its file is now, right click it and choose Locate…, then pick the file. Euphoria reads the file you picked and compares its audio with what the track held. When they match, the track, its playlists, its stars and favorite transitions, and the key, tempo and cues you set follow the file, and its analysis comes back from the cache without analyzing again. Every other missing track whose file sits in the same folder under the same name, with the same audio, is linked too, so locating one track of a moved folder finds the rest. When the picked file holds other audio, nothing changes and a notice says so. When nothing was recorded about the track’s audio, Euphoria cannot check the file and asks first: Link anyway links it, Cancel leaves the track missing.
Remove from Library in the same menu takes the missing tracks of the selection out of the library, out of every playlist and out of the favorites. Tracks whose file is there are left alone. Until you remove a missing track, its playlists, favorites and edited cues keep it, so unplugging a drive loses nothing.
A remembered folder that is not there when the app opens is named in the notice and stays remembered: it is searched again at the next launch, and its tracks come back then.
The command line reports missing files the same way, on missing: lines with exit status 3.
Limits: there is no way yet to forget a remembered folder, and a deleted file of a remembered folder that is in no playlist or favorite is not shown as missing; it is simply not found when the folder is searched.
Themes
Choose a theme from the menu at the right of the toolbar, or from View > Theme.
| Theme | Looks like |
|---|---|
| Slate | Dark grey with a blue accent. The default. |
| Paper | Light with a blue accent. |
| Deck | Slate colours, with the track detail and the player in a strip under the table and a wide waveform. |
| Graphite | Warm dark grey with an amber accent, compact rows, and keys as coloured text. |
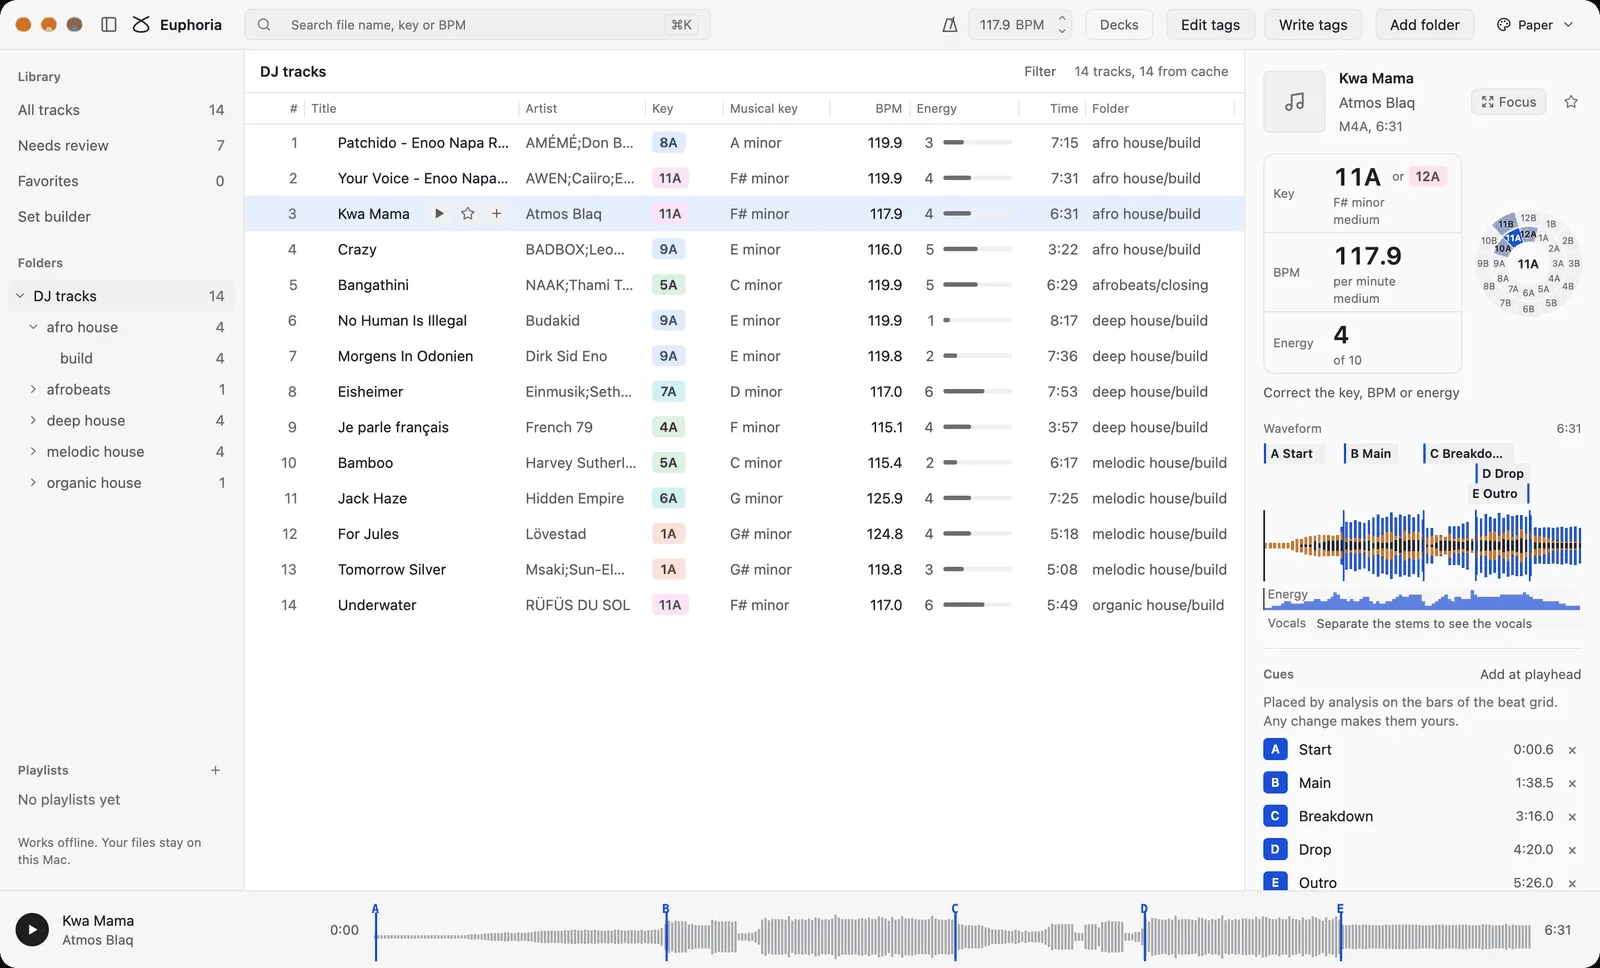
Motion
Changes to what is on screen ease instead of cutting, and each one has a set time:
| Change | Time |
|---|---|
| Settings, Export, tag editor and Write tags preview: backdrop fades in, card fades in and rises 8 px | 180 ms in, 120 ms out |
| Notice, held tags and confirmation strips grow to their height | 220 ms |
| Write tags preview list dims while it is worked out again for changed settings, and comes back | 120 ms |
| Focus view and the library crossfade, both ways | 180 ms |
| Switching theme blends the colours | 160 ms |
| Sidebar, sections, toast, palette | as described where they are introduced |
All of it is instant with macOS Reduce motion on, and nothing asks for frames while it is still, so the app uses no CPU when idle. Esc goes up one level: the transition planner to the focus view, the focus view to the library. Hover and selection backgrounds still change in a single frame; they are not animated.
While analysis runs, the toolbar says “about N min left” next to the progress bar once ten seconds of the run have been seen, and the sidebar counts that still move (Needs review and Favorites) end in an ellipsis, such as “11…”, until analysis finishes.
What the app remembers
The palette’s recent tracks and most used commands are kept in memory only. Playlists and favorites are kept in playlists.sqlite3, as Where playlists are kept and Where favorites are kept explain. The folders you added, the theme, whether the sidebar is folded, the sizes you gave the inspector and the Deck strip, which sections of the inspector you opened or closed, the lanes of the focus view you hid, the metronome’s sound, volume and accent, the folders you opened in the tree, the folder on show, the column widths you chose, the track filters, how keys and tempos are shown and the tag writing settings are kept in settings.json. The backups of tag writes are kept in the tag-writes folder beside it:
| System | Folder |
|---|---|
| macOS | ~/Library/Application Support/euphoria |
| Linux | $XDG_DATA_HOME/euphoria, or ~/.local/share/euphoria |
| Windows | %APPDATA%\euphoria |
Set the EUPHORIA_DATA_DIR environment variable to keep it somewhere else.
Files dropped on their own, outside a folder, are not remembered. If the folder that was on show is gone the next time, for example on a drive that is not connected, the app starts on All tracks. The folder stays remembered and is searched again at the next launch.
Remembered results
The app keeps each finished analysis in the same folder, in the cache the command line tool also uses. A track analyzed once, by the app or by euphoria analyze, is not analyzed again: when the app starts, the remembered folders are searched and their known tracks are filled in within a moment. Only new or changed files are analyzed. A file that was moved or renamed is recognised by its content when its turn comes.
The count above the table says how many tracks were filled in this way, for example “48 tracks, 44 from cache”.
If the cache cannot be opened, the app says why in a notice along the bottom of the window and analyzes without it, so results are not remembered until the problem is fixed. euphoria cache clear resets a damaged cache. The command reference explains how files are recognised and when a track is analyzed again.
Live
The Live button in the toolbar, View, Live and Command Shift L open a small panel that stays on top and shows the key and tempo of whatever the Mac is playing, with the tracks of your library that mix in. Live keeps running in the menu bar when you close the window. See Euphoria Live.
Quitting
You can quit while tracks are being analyzed. With Live running and Keep Live running when the window is closed on, closing the window leaves Euphoria in the menu bar; Quit Euphoria there, or Command Q, quits it. The app closes at once: tracks already finished are remembered, and the ones that were waiting or in progress are analyzed the next time the app starts.
Build Euphoria.app
To get an application you can keep in the Dock and put in Applications, build an installable bundle on macOS:
./scripts/bundle-macos.sh
open target/release/bundle/Euphoria.app
The script builds the app in release mode, makes the icon from assets/logo, signs it (ad hoc by default, with a Developer ID when EUPHORIA_SIGN_IDENTITY is set), and writes target/release/bundle/Euphoria.app and a disk image, Euphoria-<version>.dmg, next to it. Installation covers installing it and opening it for the first time. Releases on GitHub carry the same disk image, built by CI.
Try it without music
To see how the interface behaves with a large library, start the app with made up tracks. Their keys and tempos are invented and nothing is analyzed:
EUPHORIA_DEMO_TRACKS=10000 cargo run -p euphoria-desktopAbout the screenshots
The screenshots on this page and in the README show a demo library of GiantSteps Key previews, the clips the benchmarks use, never anyone’s own music. make_screenshots.py builds that library, runs the app on it and captures the window again when the app changes.
Not there yet
- On the decks: mashups of more than two tracks, favorite transitions, nudging, pitch bend, and loops shorter than a bar or moved by hand.
- Rating favorites (more than one star), and exporting favorite transitions with their notes.
- Loops, and cue colours.
- The metronome’s lock to a playing track and the playback tempo are tested for click and playhead timing, pitch and the headless interface, not heard on a real output: listen for yourself and report anything off. The metronome and the track are separate sounds in the output, so a few milliseconds of difference between them from the device’s buffers is possible.
- Hearing the reference tone and piano has not been checked by an automated test, which can only check that their sound is made and mixed: listen for yourself and report anything off.
- Windows builds. On Linux the app is built, linted and its headless interface tests run on every change, and each release’s AppImage is started on a clean Ubuntu 22.04 under a virtual X server, but playback, the file dialogs and a real Wayland session are not checked by an automated test there yet. Linux has no menu bar: the theme is chosen from the toolbar, but Reset Column Widths has no other control there yet. The keyboard shortcuts use Control where macOS uses Command.